Makeshift Flashlight
For my creative switch I decided to create a makeshift flashlight that can alternate between different lights and being turned off.
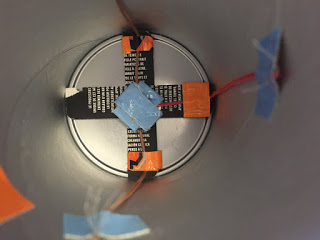
1. First start off with a cylinder type shape container.
You can use something like a Pringles can or a can of nuts, preferably empty at the time of use.
2. Now that you have decided which container you want to use measure the diameter of the can to create a base for your battery. You can use a piece of cardboard or fold together pieces of paper to create a thicker base. Making a crossbeam with the pieces is ideal to create stability.
3. Since I will be using LEDs that require little power I will be using a small 3V Lithium Battery. If you want to use bigger lights you can use a higher voltage battery. Now using the battery as a center piece you will add it to the top of the crossbeam.
4. This next step is very important. You have to decide how the output of the battery and the wiring will go. For my switch I decided to go with the diagram I have, but you can also flip it to your preference.
5. Now that you have decided the layout you can cut three wires the length from the battery and crossbeam to about an inch off the top of the can. Using tape you can secure the wires to the appropriate side of the battery and the crossbeam and also the side of the can. Make sure to strip the wire to expose the inside for better contact.
6. Now using the cap of the can, you can create a nest for the LEDs and their wiring. For this you need two more pieces of cardboard to make a T shape like in the picture, or a crossbeam again, but note that you will only need three sides to complete the switch.
7. With that complete the complementing circuit to complete the switch for the battery is in the diagram bellow. If you have decided to flip the one for the battery, all you have to do is flip the one for the nest.
8. With a pair of pliers bend the LED’s legs to face the direction of the wiring. (I.e. positive leg to positive side of the beam.) Since there is only one positive side both the LEDs will be sharing the same wire and make sure you position their legs to face each other. The negative legs can use either negative beams as long as they are not occupying the same one.
9. Secure the LEDs to the nest with tape, but be sure to leave enough of the legs open to attach wires to them. Now cut three wires and strip three wires from the legs of the LEDs to the sides of the cans where the wires from the batteries are and secure them with tape.
10. There are a variety of methods to suspend the nest from the cap, but the method that I used was creating a paper clip swing. Unravel two paper clips to create a G shape like in the picture.
11. Tape the paper clips to the top of the cap across from each other with enough distance to be near the end of the nest that you have created.
12. Then secure the nest to the suspension with tape of any other adhesive to keep in place.
13. Now carefully lowering the nest into the can, put the cap back on. The lights should alternate as you turn the can.


