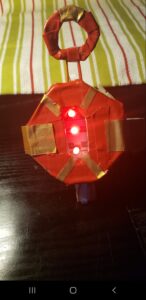
Inspired by Iron Man, I wanted to make an Iron Man hand blaster. Not a blaster in a sense that it can destroy things but rather to blast light so basically a hand light. In the movies, Iron Man usually opens his hand to power up his hand blaster and then closes it to turn it off. This was the movement I wanted to capture when turning on and off the LEDS. with all that said let’s get to building.
Materials: (These are a lot of common household items)
- Cardboard
- Card stock paper (1 sheet)
- conductive tape (double-sided)
- 3 LEDs (any color of your choice)
- 1, 3v coin cell battery
- 2 regular sized paper clips (I used red ones in mine but any color works)
- Colored duct tape (Red and Gold, this is for the iron man design)
- some aluminum foil
- ruler
- scissors
- tape
- hot glue gun
Construction, to get a sense of how its going to look like, here are the blueprints:
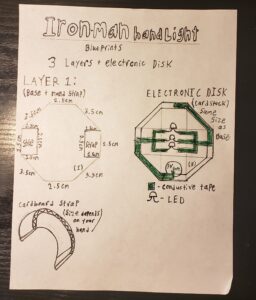
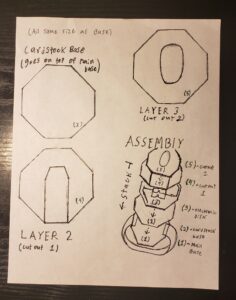
Layer 1:
Layer 1 is the base in which all the layers rest on, it is also the layer where the strap is attached at. the materials you will need in this portion are: cardboard, some card stock paper, tape, hot glue gun, and scissors. the base is made using cardboard. to make things easier, the overall shaping of the hand light are hexagons. the measurements are in the blueprints but in case it is hard to see they are: Long sides (going diagonal) 3.5cm and the shorter sides (going straight) are 2.5cm. you will need to make a semi complete cutout that allows the strap to be fitted in. where it says strap for layer 1, you will need to make a cut where it says 1.5cm. it essentially makes a flap for the strap to be placed under. once you finish all that, comes the strap. using the cardboard, cut out a long (length varies by the size of your hand) strip that’s 1.5cm in width. place it under the flap you made on the base and tape it to both sides of the flap so it stays in place. After this create the base using the same measurements as before using the card stock paper, this will help keep a smooth surface to attach the next component. you can attach the card stock using a hot glue gun.


Electronic disk:
This is the brains of the operation, here you will have the connection to the LED along with the battery. the materials for this portion are: Card stock paper, Conductive tape, 3 LEDs (of your color preference), a 3v coin cell battery, some regular tape, hot glue, and 2 small pieces of cardboard. cut out another hexagon using the same measurements as before using the card stock paper. as seen in the blueprints, align the conductive tape where it’s highlighted in green, this is called a parallel circuit which will relay the same amount of current across the LEDs. lay your 3 LEDs and tape the legs down to the highlighted portion. Remember that the short leg of the LED goes on the left side and the longer leg goes on the right side. you may then tape the battery (using a tiny strip, don’t want to block the connection) on to the bottom part of the hexagon (shown in blueprint). after all this is done cut out 2 small pieces of cardboard and pay attention to the sides of it, 1 side is wavy and the other is kind of empty, the side that is empty will be important later on.


The Sliding Mechanism:
In order to get the motion of opening and closing your hand to turn on the LED, you’re going to need a mechanism that will hit the battery to turn on the lights. the materials you will need are: 2 regular size paper clips, a strip of card stock paper, the card stock base that goes on to the main base, regular tape, conductive tape, some cardboard, and some colored duct tape. Step 1. unfold the 2 paperclips all the way so that they are just straight lines and then fold one end of the 2 paper clips in a 150 degree angle (almost like a sleigh). Step 2, wrap tape around the 2 paper clips leaving about 1cm of space in between. now the paper clips should be together. next is the ring upon which you will put your finger in to lift up and down the mechanism. cut out a ring shape using cardboard (adjust to fit your finger), wrap the colored duct tape around to make the card board more durable and for aesthetic purposes. tape the ring to end of the 2 paper clips that is not folded. now take the conductive tape and do not unwrap it so it exposes the sticky side, keep the white protective layer in tact. wrap the conductive tape around the regular tape and leave space for the electronic disk (see image below for better understanding). there should be a little piece of conductive tape that is poking out at the bottom. tape it so that it is in a straight position while leaving a bit of exposed so that it can touch the battery. next, take the strip of card stock abut the size of the card stock base and tape it on (look at image for more reference) take the 2 pieces of cardboard that have the wavy and empty side and hot glue them to the center of the white card stock base, leaving about 1cm of space in between. this is where the 2 paper clips will rest on, essentially it’s a rail system. insert the the 2 paperclips into the empty sides of the cardboard and it should just be able to slide up and down.


Layer 2 and 3:
These next steps are pretty simple, all you need is some card board, hot glue, some aluminum foil, and colored duct tape (for the iron man look). for Layer 2, cut out another hexagon with the same measurements as before but cut out a rectangle within the middle. this cutout to allows enough space for the electronic disk to rest on without it being crushed by cardboard. for layer 3, cutout another hexagon shape with the same measurements but this time cut an oval around the middle, this makes things neater and just allows for you to just see the LEDs inside. take some aluminum foil and glue it on the insides of the oval hole to make things neater. finally glue layer 3 on top of layer 2 and then you may add colored duct tape (gold and red) for the iron man aesthetic.
. 

Assembly:
Now that you have everything, its time to assemble the whole contraption. the blueprints lay out what goes on top of what. first is the main base with the strap, on top of it is the card stock base that should be hot glued on. it should have the 2 little pieces of cardboard that’s housing the 2 paperclips so it goes up and down. go ahead and tape or glue the electronic disk on top of the 2 little pieces of cardboard. once that’s done, there should be some conductive tape poking out near the ring. go ahead and tape that down to the top portion of the electronic disk that has conductive tape already at the top. now lay down the 2 stacked pieces of cardboard. to secure it all in place, use colored duct tape. put a strip at the very end of the strap and end it at the top of layer 3 (Look at image for better explanation). at the bottom of the paperclips should be another side of the conductive tape poking out which is crucial for this to work. before securing everything, make sure the sliding mechanism works, make sure that the light turn on as you are pulling up and turns off as you pull down. add any more aesthetic choices and you’re done!


The way it works is that the circuit becomes complete as you are lifting the paper clips with the conductive tape up. the conductive tape touches the battery and powers on the LEDs. when you lower it, the tape stops touching the battery and then no power flows through.
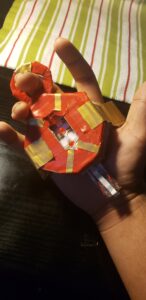
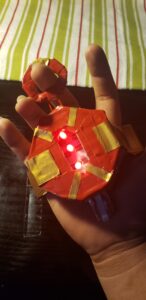
Demonstration:
Hope you like it!
;