Interactive Painting :
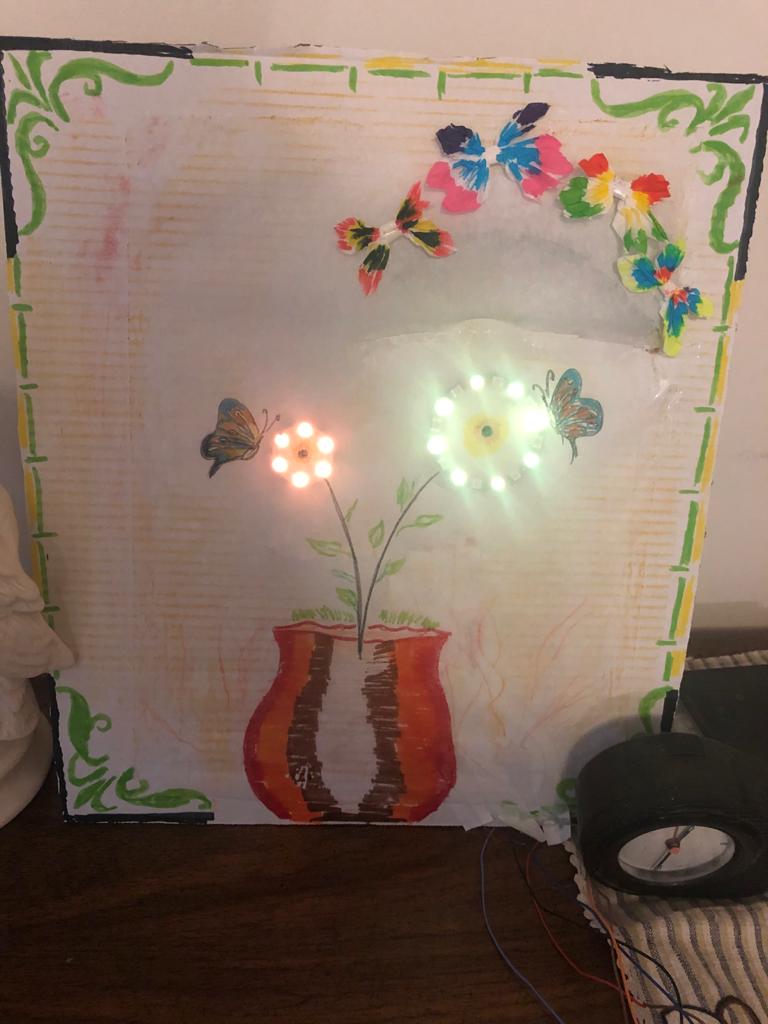
For my project, I made a sound reactive interactive painting.Interactive painting is project consisting of floral painting. The main two flower are made up from neopixel rings and they keep on glowing on and off. They change their color based on the loudness of the sound that the sound sensor picks up on the Circuit Playground Express Project also uses neopixel strip that glows based on the data capture from sound sensor. Painting can be used anywhere like at home or outside anywhere.
Materials Needed with links to vendor:
Materials needed:
- ADAFRUIT Circuit Playground Classic MCU Development Board 3000 (Price :17.50; Link )
- Adafruit Ring of 12 Neopixels (Price :7.49; Link )
- 5V Strip of 11 RGB LEDs (Price: 1.71-19.78; Link )
- Jumper Wires (Price: 1.95; Link )
- 5V Rechargeable Battery with USB A connection (Price : 4.99; Link )
- Printer Cable (USB A to B cable)(Price: 3.91; Link )
- Glue Dots or Hot Glue (Price: 3.19; Link )
- A4 Card (Price:0.10; Link )
- Paint box (Price:2.23 each color; Link )
- Masking Tape (Price: 3.99; Link )
- 9 Self-Adhesive Velcro Tabs(Price: 2.93; Link )
- Cardboard (Price:1.78; Link )
Tools needed:
- A computer/laptop with Arduino IDE downloaded
- Soldering Iron and Lead-Free Solder
- Breadboard for testing circuit
- Wire Stripper/Cutters
- Scissors
STEP 1:The first thing to do is to paint the canvas . Draw and paint the butterflies and frame outline. You can also design based on your likes. Mark the outline where you have to attach your neopixel rings and neopixel strip so as to make it easy to wire behind the canvas and help guide where to place the neopixel strip and neopixel rings.
STEP 2: Prepare the neopixel rings:
Use three different colors of wire, one for ground, one for data, and one for power.I used black for ground, red for power, and green for data. Solder the wires to each of the power, ground and data pads(DIN) on the back of the NeoPixel ring. Connect the two neopixel in parallel connection by soldering the their power wires together and their data wires together and ground wires together.
![]()
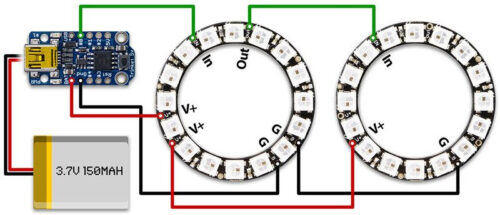
Solder the other side of the power wire onto the circuit play ground 3.3V, data wire (DIN)onto the A6 and ground wire onto the GND. Make a note of which wires are for the power, data and ground because the markings for these are on the underside of the ring and won’t be visible when the ring is in position. Also tape down the wires when soldering so that they don’t move.
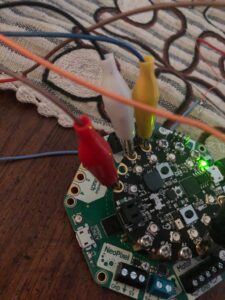
STEP 3:Prepare the neopixel strip:
Take red wire for power, black for ground and green for data and solder green wire onto the data pad(DIN), red wire on VOUT and black wire on GND.Solder the other side of the power wire onto the circuit play ground 3.3V, data wire (DIN)onto the A2 and ground wire onto the GND.
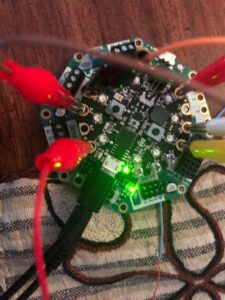
Complete wiring:
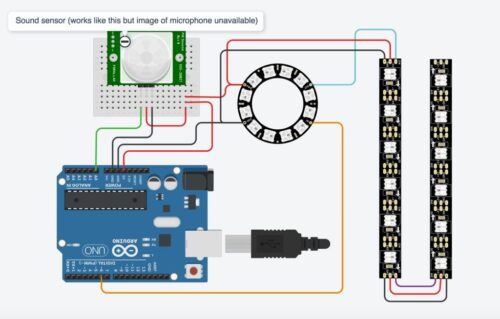
STEP 4:Programming Arduino:
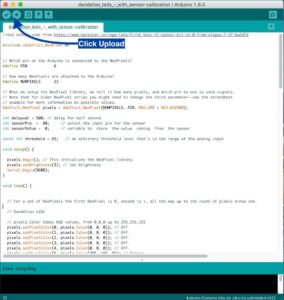
Open Arduino IDE on your computer and start a new Sketch
Delete everything inside the sketch and copy and paste this code into it instead.
#include <Adafruit_NeoPixel.h>
#include <Adafruit_CircuitPlayground.h>
#include <FastLED.h>
#include “Adafruit_Crickit.h”
// Which pin on the Arduino is connected to the NeoPixels?
#define PIN A6
// How many NeoPixels are attached to the Arduino?
#define NUMPIXELS 20
#define sensorPin CRICKIT_SIGNAL8 // Attach your mic pin A0 to I/O socket 3
#define BUTTON_1 CRICKIT_SIGNAL3 // Attach your mic pin D0 to I/O socket
// When we setup the NeoPixel library, we tell it how many pixels, and which pin to use to send signals.
// Note that for older NeoPixel strips you might need to change the third parameter–see the strandtest
// example for more information on possible values.
Adafruit_NeoPixel pixels = Adafruit_NeoPixel(NUMPIXELS, PIN, NEO_GRB + NEO_KHZ800);
int delayval = 200; // delay for half second
#define DATA_PIN A2
#define NUM_LEDS 11
CRGB leds[NUM_LEDS];
int val; // analog read value
Adafruit_Crickit crickit;
void setup() {
CircuitPlayground.begin();
pixels.begin(); // This initializes the NeoPixel library.
pixels.setBrightness(20); // Set brightness
Serial.begin(9600);
if (!crickit.begin()) {
Serial.println(“ERROR!”);
while (1);
}
else Serial.println(“crickit started”);
//reed relay acts as a button – buttons are pullups, connect to ground to activate
crickit.pinMode(BUTTON_1, INPUT_PULLUP);
FastLED.addLeds<NEOPIXEL, DATA_PIN>(leds, NUM_LEDS);
FastLED.setBrightness(250); //half brightness
}
void loop() {
// For a set of NeoPixels the first NeoPixel is 0, second is 1, all the way up to the count of pixels minus one.
// Dandelion LEDs
// pixels.Color takes RGB values, from 0,0,0 up to 255,255,255
pixels.setPixelColor(0, pixels.Color(255, 165, 0)); // Off.
pixels.setPixelColor(1, pixels.Color(255, 165, 0)); // Off.
pixels.setPixelColor(2, pixels.Color(255, 165, 0)); // Off.
pixels.setPixelColor(3, pixels.Color(255, 165, 0)); // Off.
pixels.setPixelColor(4, pixels.Color(255, 165, 0)); // Off.
pixels.setPixelColor(5, pixels.Color(255, 165, 0)); // Orange.
pixels.setPixelColor(6, pixels.Color(255, 165, 0)); // Orange.
pixels.setPixelColor(7, pixels.Color(255, 165, 0)); // Orange.
pixels.setPixelColor(8, pixels.Color(255, 165, 0)); // Orange.
pixels.setPixelColor(9, pixels.Color(255, 165, 0)); // Orange.
pixels.setPixelColor(10, pixels.Color(255, 165, 0)); // Orange.
pixels.setPixelColor(11, pixels.Color(255, 165, 0)); // Orange.
pixels.setPixelColor(12, pixels.Color(255, 165, 0)); // Off.
pixels.setPixelColor(13, pixels.Color(255, 165, 0)); // Off.
pixels.setPixelColor(14, pixels.Color(255, 165, 0)); // Off.
pixels.setPixelColor(15, pixels.Color(255, 165, 0)); // Off.
pixels.setPixelColor(16, pixels.Color(255, 165, 0)); // Off.
pixels.setPixelColor(17, pixels.Color(255, 165, 0)); // Off.
pixels.setPixelColor(18, pixels.Color(255, 165, 0)); // Off.
pixels.show(); // This sends the updated pixel color to the hardware.
leds[0].setRGB(0,0,0);
leds[1].setRGB(0,0,0);
leds[2].setRGB(0,0,0);
leds[3].setRGB(0,0,0);
leds[4].setRGB(0,0,0);
leds[5].setRGB(0,0,0);
leds[6].setRGB(0,0,0);
leds[7].setRGB(0,0,0);
leds[8].setRGB(0,0,0);
leds[9].setRGB(0,0,0);
leds[10].setRGB(0,0,0);
FastLED.show();
delay(delayval*6);//Gradual change from flower to seed head
pixels.setPixelColor(0, pixels.Color(255, 165, 0)); // Bluish white.
pixels.setPixelColor(1, pixels.Color(0,0,0)); //off
pixels.setPixelColor(2, pixels.Color(255, 165, 0)); // Bluish white.
pixels.setPixelColor(3, pixels.Color(0,0,0)); // Bluish white.
pixels.setPixelColor(4, pixels.Color(255, 165, 0)); // Bluish white.
pixels.setPixelColor(5, pixels.Color(0,0,0)); // Orange.
pixels.setPixelColor(6, pixels.Color(255, 165, 0)); // Bluish white.
pixels.setPixelColor(7, pixels.Color(0,0,0)); // Orange.
pixels.setPixelColor(8, pixels.Color(255, 165, 0)); // Bluish white.
pixels.setPixelColor(9, pixels.Color(0,0,0)); // Bluish white.
pixels.setPixelColor(10, pixels.Color(255, 165, 0)); // Bluish white.
pixels.setPixelColor(11, pixels.Color(0,0,0)); //Bluish white.
pixels.setPixelColor(12, pixels.Color(255, 165, 0)); // Off.
pixels.setPixelColor(13, pixels.Color(0, 0, 0)); // Off.
pixels.setPixelColor(14, pixels.Color(255, 165, 0)); // Off.
pixels.setPixelColor(15, pixels.Color(0, 0, 0)); // Off.
pixels.setPixelColor(16, pixels.Color(255, 165, 0)); // Off.
pixels.setPixelColor(17, pixels.Color(0, 0, 0)); // Off.
pixels.setPixelColor(18, pixels.Color(255, 165, 0)); // Off.
pixels.show(); // This sends the updated pixel color to the hardware.
delay(delayval*3); // Delay for a period of time (in milliseconds).
//delay(10);*/
int soundLevel = CircuitPlayground.mic.soundPressureLevel(10); //sound level checked every .1 seconds
soundLevel = abs(soundLevel);
Serial.println(soundLevel);
Serial.println(“soundlevel”);
Serial.write(soundLevel);
if(soundLevel > 60)
{
//delay(100);
// pixels.Color takes RGB values, from 0,0,0 up to 255,255,255
pixels.setPixelColor(0, pixels.Color(226,246,255)); // Off.
pixels.setPixelColor(1, pixels.Color(255, 165, 0)); // Off.
pixels.setPixelColor(2, pixels.Color(226,246,255)); // Off.
pixels.setPixelColor(3, pixels.Color(255, 165, 0)); // Off.
pixels.setPixelColor(4, pixels.Color(226,246,255)); // Off.
pixels.setPixelColor(5, pixels.Color(226,246,255)); // bluishwhite
pixels.setPixelColor(6, pixels.Color(255, 165, 0)); // Orange.
pixels.setPixelColor(7, pixels.Color(226,246,255)); // bluishwhite
pixels.setPixelColor(8, pixels.Color(255, 165, 0)); // Orange.
pixels.setPixelColor(9, pixels.Color(226,246,255)); // bluishwhite
pixels.setPixelColor(10, pixels.Color(255, 165, 0)); // Orange.
pixels.setPixelColor(11, pixels.Color(226,246,255)); // bluishwhite.
pixels.setPixelColor(12, pixels.Color(255, 165, 0)); // Off.
pixels.setPixelColor(13, pixels.Color(226,246,255)); // Off.
pixels.setPixelColor(14, pixels.Color(255, 165, 0)); // Off.
pixels.setPixelColor(15, pixels.Color(226,246,255)); // Off.
pixels.show(); // This sends the updated pixel color to the hardware.
delay(delayval*6);
//delay(10);
pixels.setPixelColor(0, pixels.Color(226, 246, 255)); // Bluish white.
pixels.setPixelColor(1, pixels.Color(0,0,0)); //off
pixels.setPixelColor(2, pixels.Color(226, 246, 255)); // Bluish white.
pixels.setPixelColor(3, pixels.Color(0,0,0)); //off
pixels.setPixelColor(4, pixels.Color(226, 246, 255)); // Bluish white.
pixels.setPixelColor(5, pixels.Color(255, 165, 0)); // Orange.
pixels.setPixelColor(6, pixels.Color(226, 246, 255)); // Bluish white.
pixels.setPixelColor(7, pixels.Color(255, 165, 0)); // Orange.
pixels.setPixelColor(8, pixels.Color(226, 246, 255)); // Bluish white.
pixels.setPixelColor(9, pixels.Color(255, 165, 0)); // Orange.
pixels.setPixelColor(10, pixels.Color(226, 246, 255)); // Bluish white.
pixels.setPixelColor(11, pixels.Color(226, 246, 255)); //off
pixels.setPixelColor(12, pixels.Color(0, 0, 0)); // Off.
pixels.setPixelColor(13, pixels.Color(255, 165, 0)); // Off.
pixels.setPixelColor(14, pixels.Color(0, 0, 0)); // Off.
pixels.setPixelColor(15, pixels.Color(0, 0, 0)); // Off.
// This sends the updated pixel color to the hardware.
//light for strip
leds[0].setRGB(random(255),random(255),random(255));
leds[1].setRGB(0,0,0);
leds[2].setRGB(random(255),random(255),random(255));
leds[3].setRGB(0,0,0);
leds[4].setRGB(random(255),random(255),random(255));
leds[5].setRGB(0,0,0);
leds[6].setRGB(random(255),random(255),random(255));
leds[7].setRGB(0,0,0);
leds[8].setRGB(random(255),random(255),random(255));
leds[9].setRGB(0,0,0);
leds[11].setRGB(random(255),random(255),random(255));
FastLED.show();
pixels.show();
delay(750);
delay(delayval*3); // Delay for a period of time (in milliseconds).
}
if(soundLevel > 65)
{
pixels.setPixelColor(0, pixels.Color(226,246,255)); // Off.
pixels.setPixelColor(1, pixels.Color(0,0,0)); // Off.
pixels.setPixelColor(2, pixels.Color(226,246,255)); // Off.
pixels.setPixelColor(3, pixels.Color(0,0,0)); // Off.
pixels.setPixelColor(4, pixels.Color(226,246,255)); // Off.
pixels.setPixelColor(5, pixels.Color(0,0,0)); // Off.
pixels.setPixelColor(6, pixels.Color(226,246,255)); // Off.
pixels.setPixelColor(7, pixels.Color(0,0,0)); // Off.
pixels.setPixelColor(8, pixels.Color(226,246,255)); // Off.
pixels.setPixelColor(9, pixels.Color(0,0,0)); // Off.
pixels.setPixelColor(10, pixels.Color(226,246,255)); // Off.
pixels.setPixelColor(11, pixels.Color(0,0,0)); // Off.
pixels.setPixelColor(12, pixels.Color(226,246,255)); // Off.
pixels.setPixelColor(13, pixels.Color(0,0,0)); // Off.
pixels.setPixelColor(14, pixels.Color(226,246,255)); // Off.
pixels.setPixelColor(15, pixels.Color(0,0,0)); // Off.
pixels.show();
delay(delayval*6);
}
if(soundLevel > 75)
{
pixels.setPixelColor(0, pixels.Color(0,0,0)); // Off.
pixels.setPixelColor(1, pixels.Color(0,0,0)); // Off.
pixels.setPixelColor(2, pixels.Color(226,246,255)); // Off.
pixels.setPixelColor(3, pixels.Color(0,0,0)); // Off.
pixels.setPixelColor(4, pixels.Color(0,0,0)); // Off.
pixels.setPixelColor(5, pixels.Color(0,0,0)); // Off.
pixels.setPixelColor(6, pixels.Color(226,246,255)); // Off.
pixels.setPixelColor(7, pixels.Color(0,0,0)); // Off.
pixels.setPixelColor(8, pixels.Color(0,0,0)); // Off.
pixels.setPixelColor(9, pixels.Color(0,0,0)); // Off.
pixels.setPixelColor(10, pixels.Color(226,246,255)); // Off.
pixels.setPixelColor(11, pixels.Color(0,0,0)); // Off.
pixels.setPixelColor(12, pixels.Color(0,0,0)); // Off.
pixels.setPixelColor(13, pixels.Color(0,0,0)); // Off.
pixels.setPixelColor(14, pixels.Color(226,246,255)); // Off.
pixels.setPixelColor(15, pixels.Color(0,0,0)); // Off.
pixels.show(); // This sends the updated pixel color to the hardware.
delay(delayval*6);
}
}
STEP 5: Uploading code
Attach your Arduino to the computer with the USB printer cable
Go to Tools > Board and select the Arduino/Genuino UNO board
Go to Port and make sure you’ve got the board connected to the right USB port. If you’re unsure you can unplug the Arduino and see which port disappears from the list. Plug it back in and the port will be listed again.
Upload the sketch by clicking on the Upload icon, shown in the annotated photo. Lights should flash on the Arduino while it uploads. When it finishes uploading half the LEDs on the neopixel ring will light up yellow on and off. Blow or talk near the painting and neopixel ring will change color into white and the strip will light up. Check the solder on any LEDs that don’t work.
STEP 6: Make butterflies:
Use tissue paper to make butterflies and paint onto tissue paper.

STEP 7: Putting it together:
Make two holes in the white cardboard and insert all the wires on the back side of the white board.
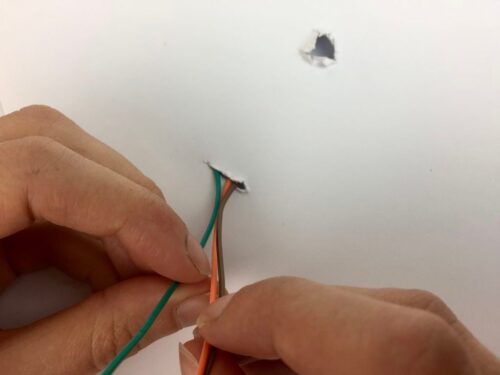
Attach the neopixel rings and strip on the white cardboard and also cover all the wires by using white masking tape. Place the thin parchment canvas sheet on the top of all the order to cover everything.Place and attach the circuit playground on the backside of the white board.

Plug the Circuit playground cable with the printer cable and plug it into electric switch. Once plugged in the flower will start to glow and the more louder the sound then neopixel ring will change color and strip will light up illuminating the butterflies.
