Title: Pulsing Heart
Materials:
- Circuit Playground Express
- HDMI cord
- alligator clips with female ends
- pulse sensor with male ends
- electric tape
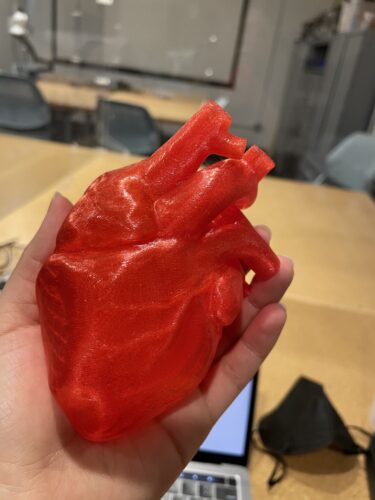
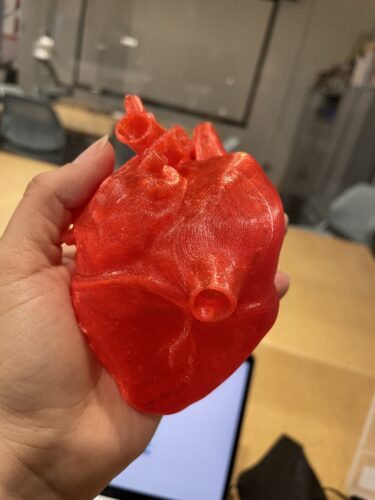
- 3D printed anatomy heart
Step 1: download pulsing heart code – you can find various versions online or check out MakeCode
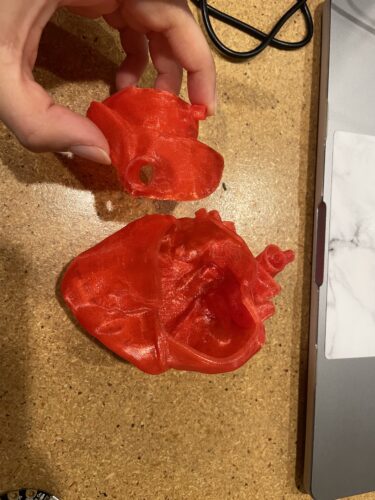
Step 2: Go to – https://learn.adafruit.com/3d-printed-heart-capacitive-touch . . . download the 3D print files for the heart and have them printed out. Here you have the option on clear or red filament, choose to your liking. Make sure the two pieces don’t have sharp edges, if they do file it down.


Step 3: Drill a hole on the side or anywhere that your finger would naturally fall when holding the heart. The wires will go through this

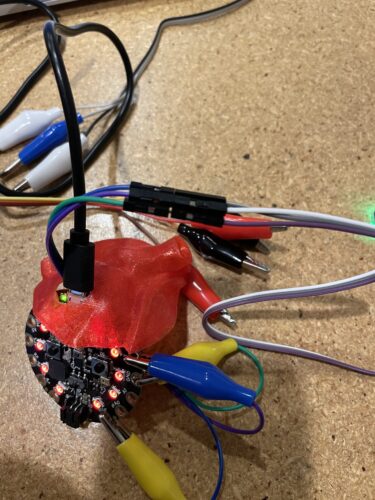
Step 4: Connect the alligator clips to the circuit playground

Step 5: Connect the male end of the pulse sensor to the female ends of the alligator clips. You’ll know that the pulse sensor is working if the green light turns on.
Step 6: From there you can download the code onto the circuit playground express.
Step 7 : Tape the connectors using electrical tape to make sure they don’t unplug.
Step 8: Place your finger or thumb on the pulse sensor. You’ll have to wait a few minutes to seconds before it starts to work.
The Code:
*/
#include “FastLED.h”
#include <Adafruit_CircuitPlayground.h>
#define TIMER_INTERRUPT_DEBUG 0
#define _TIMERINTERRUPT_LOGLEVEL_ 0
#include “SAMDTimerInterrupt.h”
#include “SAMD_ISR_Timer.h”
#define HW_TIMER_INTERVAL_MS 2 // milliseconds
#define TIMER_INTERVAL_US 2 // microseconds
SAMD_ISR_Timer ISR_Timer;
// Variables
volatile int pulsePin = A2; // Pulse Sensor purple wire connected to analog pin A0
volatile int fadeRate = 0; // used to fade LED on with PWM on fadePin
// Volatile Variables, used in the interrupt service routine!
volatile int BPM; // int that holds raw Analog in 0. updated every 2mS
volatile int Signal; // holds the incoming raw data
volatile int IBI = 600; // int that holds the time interval between beats! Must be seeded!
volatile boolean Pulse = false; // “True” when User’s live heartbeat is detected. “False” when not a “live beat”.
volatile boolean QS = false; // becomes true when Arduoino finds a beat.
volatile int rate[10]; // array to hold last ten IBI values
volatile unsigned long sampleCounter = 0; // used to determine pulse timing
volatile unsigned long lastBeatTime = 0; // used to find IBI
volatile int P = 512; // used to find peak in pulse wave, seeded
volatile int T = 512; // used to find trough in pulse wave, seeded
volatile int thresh = 525; // used to find instant moment of heart beat, seeded
volatile int amp = 100; // used to hold amplitude of pulse waveform, seeded
volatile boolean firstBeat = true; // used to seed rate array so we startup with reasonable BPM
volatile boolean secondBeat = false; // used to seed rate array so we startup with reasonable BPM
// Regards Serial OutPut — Set This Up to your needs
static boolean serialVisual = true; // Set to ‘false’ by Default. Re-set to ‘true’ to see Arduino Serial Monitor ASCII Visual Pulse
// Set up use of Circuit Playground NeoPixels
#define CP_PIN 17 //circuit playground’s neopixels live on pin 17
#define NUMPIXELS 10 // number of neopixels on the circuit playground
#define COLOR_ORDER GRB
volatile uint8_t brightness = 128; // Set brightness of NeoPixels here
CRGB leds [NUMPIXELS];
CRGBPalette16 currentPalette;
uint8_t maxChanges = 24;
TBlendType currentBlending;
#if (TIMER_INTERRUPT_USING_SAMD21)
#define TIMER_INTERVAL_US 2
// Init SAMD timer TIMER_TCC
SAMDTimer ITimer(TIMER_TCC);
void TimerHandler(void)
{
ISR_Timer.run();
}
#endif
void setup() {
CircuitPlayground.begin();
Serial.begin(115200); // we agree to talk fast!
FastLED.addLeds<WS2812B, CP_PIN, COLOR_ORDER>(leds, NUMPIXELS).setCorrection( TypicalLEDStrip );
FastLED.setBrightness(brightness);
currentBlending = LINEARBLEND;
set_max_power_in_volts_and_milliamps(5, 500); // FastLED 2.1 Power management set at 5V, 500mA
// currentPalette = OceanColors_p; // RainbowColors_p; CloudColors_p; PartyColors_p; LavaColors_p; HeatColors_p;
// targetPalette = ForestColors_p; // RainbowColors_p; CloudColors_p; PartyColors_p; LavaColors_p; HeatColors_p;
// targetPalette1 = LavaColors_p; // RainbowColors_p; CloudColors_p; PartyColors_p; LavaColors_p; HeatColors_p;
// targetPalette2 = HeatColors_p; // RainbowColors_p; CloudColors_p; PartyColors_p; LavaColors_p; HeatColors_p;
//FastLED.show();
//clearpixels();
CircuitPlayground.redLED(LOW);
for (int x = 0; x < NUMPIXELS; x++) {
CircuitPlayground.setPixelColor(x, 20, 0, 0);
}
while (!Serial);
delay(100);
Serial.print(F(“\nStarting PulseSensorDemo on “)); Serial.println(BOARD_NAME);
Serial.println(SAMD_TIMER_INTERRUPT_VERSION);
Serial.print(F(“CPU Frequency = “)); Serial.print(F_CPU / 1000000); Serial.println(F(” MHz”));
#if (TIMER_INTERRUPT_USING_SAMD21)
// Interval in microsecs
if (ITimer.attachInterruptInterval(TIMER_INTERVAL_US * 1000, TimerHandler))
{
// preMicrosTimer = micros();
Serial.print(F(“Starting ITimer OK, micros() = “)); Serial.println(millis());
}
else
Serial.println(F(“Can’t set ITimer. Select another freq. or timer”));
#endif
ISR_Timer.setInterval(TIMER_INTERVAL_US, ReadPulse);
}
void ReadPulse() {
// Serial.println(“read pulse”);
// CircuitPlayground.redLED(LOW);
//clearpixels();
Signal = analogRead(pulsePin); // read the Pulse Sensor
sampleCounter += 2; // keep track of the time in mS with this variable
int N = sampleCounter – lastBeatTime; // monitor the time since the last beat to avoid noise
Serial.println(“pulse read”);
// find the peak and trough of the pulse wave
if (Signal < thresh && N > (IBI / 5) * 3) { // avoid dichrotic noise by waiting 3/5 of last IBI
if (Signal < T) { // T is the trough
T = Signal; // keep track of lowest point in pulse wave
Serial.print(“trough = “); Serial.println(T);
}
}
if (Signal > thresh && Signal > P) { // thresh condition helps avoid noise
P = Signal; // P is the peak
Serial.print(“peak = “); Serial.println(P);
} // keep track of highest point in pulse wave
// NOW IT’S TIME TO LOOK FOR THE HEART BEAT
// signal surges up in value every time there is a pulse
if (N > 250) { // avoid high frequency noise
if ( (Signal > thresh) && (Pulse == false) && (N > (IBI / 5) * 3) ) {
Pulse = true; // set the Pulse flag when we think there is a pulse
// CircuitPlayground.redLED(HIGH);
// digitalWrite(blinkPin,HIGH); // turn on pin 13 LED
IBI = sampleCounter – lastBeatTime; // measure time between beats in mS
lastBeatTime = sampleCounter; // keep track of time for next pulse
if (secondBeat) { // if this is the second beat, if secondBeat == TRUE
secondBeat = false; // clear secondBeat flag
for (int i = 0; i <= 9; i++) { // seed the running total to get a realisitic BPM at startup
rate[i] = IBI;
}
}
if (firstBeat) { // if it’s the first time we found a beat, if firstBeat == TRUE
firstBeat = false; // clear firstBeat flag
secondBeat = true; // set the second beat flag
// sei(); // enable interrupts again
return; // IBI value is unreliable so discard it
}
// keep a running total of the last 10 IBI values
word runningTotal = 0; // clear the runningTotal variable
for (int i = 0; i <= 8; i++) { // shift data in the rate array
rate[i] = rate[i + 1]; // and drop the oldest IBI value
runningTotal += rate[i]; // add up the 9 oldest IBI values
}
rate[9] = IBI; // add the latest IBI to the rate array
runningTotal += rate[9]; // add the latest IBI to runningTotal
runningTotal /= 10; // average the last 10 IBI values
BPM = 60000 / runningTotal; // how many beats can fit into a minute? that’s BPM!
QS = true; // set Quantified Self flag
// QS FLAG IS NOT CLEARED INSIDE THIS ISR
}
Lights_and_Data ();
}
if (Signal < thresh && Pulse == true) { // when the values are going down, the beat is over
// digitalWrite(blinkPin,LOW); // turn off pin 13 LED
CircuitPlayground.redLED(LOW);
for (int i = 0; i < NUMPIXELS; i++) {
CircuitPlayground.setPixelColor(i, 30, 0, 0);
}
delay(10);
Pulse = false; // reset the Pulse flag so we can do it again
Serial.println(“end pulse”);
amp = P – T; // get amplitude of the pulse wave
thresh = amp / 2 + T; // set thresh at 50% of the amplitude
P = thresh; // reset these for next time
T = thresh;
}
if (N > 2500) { // if 2.5 seconds go by without a beat
Serial.println(“no pulse”);
thresh = 512; // set thresh default
P = 512; // set P default
T = 512; // set T default
lastBeatTime = sampleCounter; // bring the lastBeatTime up to date
firstBeat = true; // set these to avoid noise
secondBeat = false; // when we get the heartbeat back
}
}
void Lights_and_Data () {
serialOutput() ;
delay(10);
if (QS == true) { // A Heartbeat Was Found
//Serial.println(“new pulse”);
// BPM and IBI have been Determined
// Quantified Self “QS” true when arduino finds a heartbeat
fadeRate = 255; // Makes the LED Fade Effect Happen
// Set ‘fadeRate’ Variable to 255 to fade LED with pulse
serialOutputWhenBeatHappens(); // A Beat Happened, Output that to serial.
QS = false; // reset the Quantified Self flag for next time
}
//ledFadeToBeat(); // Makes the LED Fade Effect Happen
delay(20); // take a break
}
void serialOutput() { // Decide How To Output Serial.
if (serialVisual == true) {
arduinoSerialMonitorVisual(‘-‘, Signal); // goes to function that makes Serial Monitor Visualizer
} else {
sendDataToSerial(‘S’, Signal); // goes to sendDataToSerial function
}
}
// Decides How To OutPut BPM and IBI Data
void serialOutputWhenBeatHappens() {
CircuitPlayground.redLED(HIGH);
for (int x = 0; x < NUMPIXELS; x++) {
CircuitPlayground.setPixelColor(x, 255, 0, 0);
}
FastLED.show();
delay(30);
if (serialVisual == true) { // Code to Make the Serial Monitor Visualizer Work
//Serial.print(“*** Heart-Beat Happened *** “); //ASCII Art Madness
Serial.println(“new pulse”);
Serial.print(“BPM: “);
Serial.print(BPM);
Serial.println(” “);
} else {
sendDataToSerial(‘B’, BPM); // send heart rate with a ‘B’ prefix
sendDataToSerial(‘Q’, IBI); // send time between beats with a ‘Q’ prefix
}
}
// Sends Data to Pulse Sensor Processing App, Native Mac App, or Third-party Serial Readers.
void sendDataToSerial(char symbol, int data ) {
Serial.print(symbol);
Serial.println(data);
}
// Code to Make the Serial Monitor Visualizer Work
void arduinoSerialMonitorVisual(char symbol, int data ) {
const int sensorMin = 0; // sensor minimum, discovered through experiment
const int sensorMax = 1028; // sensor maximum, discovered through experiment
int sensorReading = data;
Serial.println(data);
// map the sensor range to a range of 12 options:
int range = map(sensorReading, sensorMin, sensorMax, 0, 11);
// do something different depending on the
// range value:
switch (range) {
case 0:
Serial.println(“”); /////ASCII Art Madness
break;
case 1:
Serial.println(“—“);
break;
case 2:
Serial.println(“——“);
break;
case 3:
Serial.println(“———“);
break;
case 4:
Serial.println(“————“);
break;
case 5:
Serial.println(“————–|-“);
break;
case 6:
Serial.println(“————–|—“);
break;
case 7:
Serial.println(“————–|——-“);
break;
case 8:
Serial.println(“————–|———-“);
break;
case 9:
Serial.println(“————–|—————-“);
break;
case 10:
Serial.println(“————–|——————-“);
break;
case 11:
Serial.println(“————–|———————–“);
break;
}
}
void loop() {
}
void ledFadeToBeat() {
fadeRate -= 15; // set LED fade value
fadeRate = constrain(fadeRate, 0, 255); // keep LED fade value from going into negative numbers!
//analogWrite(13, fadeRate); // fade LED
// digitalWrite(blinkPin,LOW); // Blink LED, we got a beat.
FastLED.show();
CircuitPlayground.redLED(LOW);
}
void clearpixels()
{
CircuitPlayground.clearPixels();
for ( int i = 0; i < NUMPIXELS; i++) {
leds[i] = CRGB::Black;
}
FastLED.show();
}