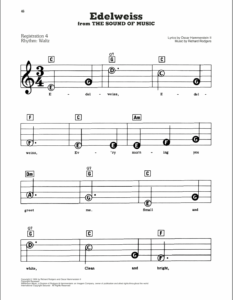
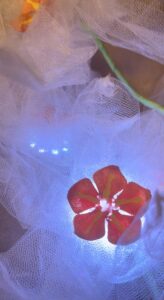
My final project was a refined version of our last assignment. I created five flowers that light up according to the different notes that are played in the song from The Sound of Music, “Edelweiss.” My target audience would be people who can read music, as I would ideally want to have an instrument and sheet music for the user to interact with the project.
Materials:
- Tissues
- Tool/mesh fabric
- Scissors
- Hot glue gun
- Ruler
- Plastic pieces(optional)
- Soldering iron
- 15 pieces of wires
- Five neopixel rings
- Circuit playground
- Green construction paper
- Thick paper material
Step 1: Assemble flower heads
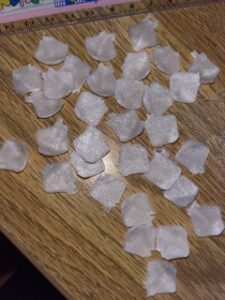
- Cut five 3 in by 3 in squares for small petals
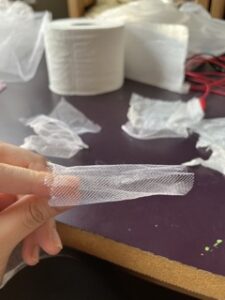
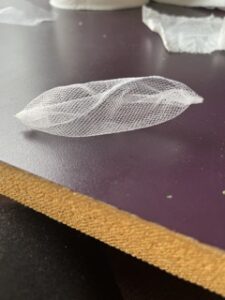
- Using the tool make a tube-like shape out of each square
- Glue both ends shut, creating a rounded petal shape
- Cut six 4.5 in by 4 in squares for big petals
- Using the tool make a tube-like shape out of each square
- Glue both ends shut, creating a rounded petal shape
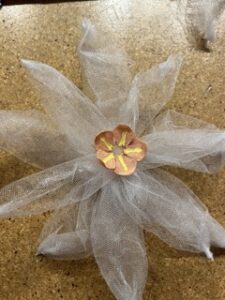
- Glue five small petals together by gluing one end of each into the center
- Glue six big petals together by gluing one end of each into the center
- Stack the flower made of smaller petals on top of the flower made of bigger petals
- Add any additional pieces to make the flower seem more realistic
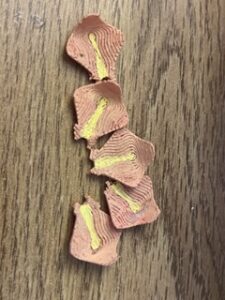
- I painted pieces of plastic orange and yellow and arranged the core/center of each flower
Step 2: Cover neopixel rings
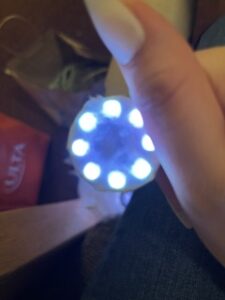
- Separate 2 ply tissue paper and fold it twice
- To conceal the neopixel rings, wrap tissue paper around each
- Seal the edges on the back using hot glue
Step 3: Soldering wires
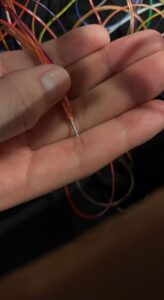
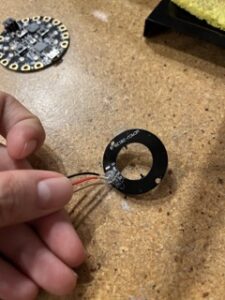
- Solder 3 wires onto each neopixel ring, each assigned to:
- Ground, vout, 5V
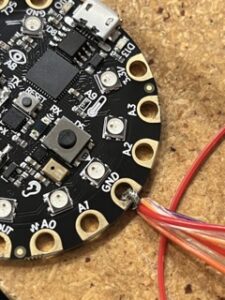
- Solder all of the wires attached to the ground together and then attach it to the GND of the circuit playground
- Solder all of the wires attached to the vout together and then attach it to the VOUT of the circuit playground
- Solder each wire that is soldered to 5V to different locations of the circuit playground, I chose:
- A1, A2, A5, A6, A7
- After soldering, cover with hot glue to seal
 .
. 
Step 4: Make Stems
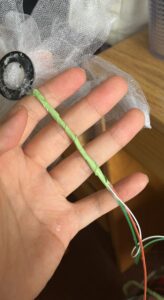
- Cut green construction paper into long strips of paper
- Wrap each strip around the 3 wires connected to each neopixel ring
- Hot glue the paper onto the wires to secure them
Step 6: Assemble flowers
- Hot glue the neopixel ring at the bottom of each flower head
- The wires should resemble the stem of the flower
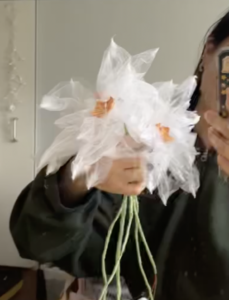
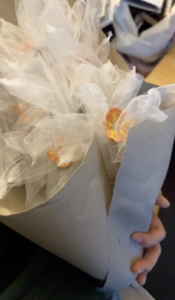
Step 7: Wrap flowers
- I used a brown paper that was between the flexibility of paper and cardboard to wrap the flowers
Step 8: Download code
- Download the code in mu editor
- Code below:
# SPDX-FileCopyrightText: 2019 Carter Nelson for Adafruit Industries
# SPDX-License-Identifier: MIT
import time
import array
import board
import audiobusio
import neopixel
# Setup NeoPixels
NEO_BRIGHTNESS = 0.05
# The number of NeoPixels on each ring
num_pixels = 8
ORDER = neopixel.GRB
pixelRing_A1 = neopixel.NeoPixel(
board.A1, num_pixels, brightness=NEO_BRIGHTNESS, auto_write=False, pixel_order=ORDER
)
pixelRing_A2 = neopixel.NeoPixel(
board.A2, num_pixels, brightness=NEO_BRIGHTNESS, auto_write=False, pixel_order=ORDER
)
pixelRing_A5 = neopixel.NeoPixel(
board.A5, num_pixels, brightness=NEO_BRIGHTNESS, auto_write=False, pixel_order=ORDER
)
pixelRing_A6 = neopixel.NeoPixel(
board.A6, num_pixels, brightness=NEO_BRIGHTNESS, auto_write=False, pixel_order=ORDER
)
pixelRing_A7 = neopixel.NeoPixel(
board.A7, num_pixels, brightness=NEO_BRIGHTNESS, auto_write=False, pixel_order=ORDER
)
# —| User Configuration |—————————
SAMPLERATE = 31500
SAMPLES = 1024
THRESHOLD = 140
MIN_DELTAS = 4
DELAY = 0.15
# octave = 1 2 3 4 5 6 7 8
NOTES = {
“C”: (33, 65, 131, 262, 523, 1047, 2093, 4186),
“D”: (37, 73, 147, 294, 587, 1175, 2349, 4699),
“E”: (41, 82, 165, 330, 659, 1319, 2637, 5274),
“F”: (44, 87, 175, 349, 698, 1397, 2794, 5588),
“G”: (49, 98, 196, 392, 785, 1568, 3136, 6272),
“A”: (55, 110, 220, 440, 880, 1760, 3520, 7040),
“B”: (62, 123, 247, 494, 988, 1976, 3951, 7902),
}
# —————————————————-
samples = array.array(“H”, [0] * SAMPLES)
mic = audiobusio.PDMIn(
board.MICROPHONE_CLOCK,
board.MICROPHONE_DATA,
sample_rate=SAMPLERATE,
bit_depth=16,
)
while True:
# Get raw mic data
mic.record(samples, SAMPLES)
# Compute DC offset (mean) and threshold level
mean = int(sum(samples) / len(samples) + 0.4)
threshold = mean + THRESHOLD
deltas = []
last_xing_point = None
crossed_threshold = False
for i in range(SAMPLES – 1):
sample = samples[i]
if sample > threshold:
crossed_threshold = True
if crossed_threshold and sample < mean:
if last_xing_point:
deltas.append(i – last_xing_point)
last_xing_point = i
crossed_threshold = False
# Try again if not enough deltas
if len(deltas) < MIN_DELTAS:
continue
mean = sum(deltas) / len(deltas)
freq = SAMPLERATE / mean
print(“crossings: {} mean: {} freq: {} “.format(len(deltas), mean, freq))
for note in NOTES:
for octave, note_freq in enumerate(NOTES[note]):
if (
note_freq * 0.97 <= freq <= note_freq * 1.02
): # set to plus or minus 1% in accuracy
print(“-” * 10)
print(“NOTE={}{}”.format(note, octave + 1))
if note == “A”:
for level in range(5, 40):
pixelRing_A2.fill((0xA3D6C4))
pixelRing_A2.brightness = float(level / 100)
pixelRing_A2.show()
for level in range(40, 5, -1):
pixelRing_A2.brightness = float(level / 100)
pixelRing_A2.show()
time.sleep(0.015)
elif note == “B”:
for level in range(5, 40):
pixelRing_A7.fill((0xDAFCF0))
pixelRing_A7.brightness = float(level / 100)
pixelRing_A7.show()
for level in range(40, 5, -1):
pixelRing_A7.brightness = float(level / 100)
pixelRing_A7.show()
time.sleep(0.015)
elif note == “C”:
for level in range(5, 40):
pixelRing_A7.fill((0xFFFFFF))
pixelRing_A7.brightness = float(level / 100)
pixelRing_A7.show()
pixelRing_A1.fill((0xFFFFFF))
pixelRing_A1.brightness = float(level / 100)
pixelRing_A1.show()
pixelRing_A5.fill((0xFFFFFF))
pixelRing_A5.brightness = float(level / 100)
pixelRing_A5.show()
pixelRing_A6.fill((0xFFFFFF))
pixelRing_A6.brightness = float(level / 100)
pixelRing_A6.show()
for level in range(40, 5, -1):
pixelRing_A1.brightness = float(level / 100)
pixelRing_A1.show()
pixelRing_A5.brightness = float(level / 100)
pixelRing_A5.show()
pixelRing_A6.brightness = float(level / 100)
pixelRing_A6.show
pixelRing_A7.brightness = float(level / 100)
pixelRing_A7.show()
time.sleep(0.015)
elif note == “D”:
for level in range(5, 40):
pixelRing_A1.fill((0xFFEDCA))
pixelRing_A1.brightness = float(level / 100)
pixelRing_A1.show()
pixelRing_A6.fill((0xFFEDCA))
pixelRing_A6.brightness = float(level / 100)
pixelRing_A6.show
pixelRing_A7.fill((0xFFEDCA))
pixelRing_A7.brightness = float(level / 100)
pixelRing_A7.show()
for level in range(40, 5, -1):
pixelRing_A1.brightness = float(level / 100)
pixelRing_A1.show()
pixelRing_A6.brightness = float(level / 100)
pixelRing_A6.show
pixelRing_A7.brightness = float(level / 100)
pixelRing_A7.show()
time.sleep(0.015)
elif note == “E”:
for level in range(5, 40):
pixelRing_A1.fill((0x7A49A5))
pixelRing_A1.brightness = float(level / 100)
pixelRing_A1.show()
time.sleep(0.015)
for level in range(40, 5, -1):
pixelRing_A1.brightness = float(level / 100)
pixelRing_A1.show()
time.sleep(0.015)
elif note == “F”:
for level in range(5, 40):
pixelRing_A5.fill((0xFEFFB4))
pixelRing_A5.brightness = float(level / 100)
pixelRing_A5.show()
pixelRing_A6.fill((0xFEFFB4))
pixelRing_A6.brightness = float(level / 100)
pixelRing_A6.show()
for level in range(40, 5, -1):
pixelRing_A5.brightness = float(level / 100)
pixelRing_A5.show()
pixelRing_A6.brightness = float(level / 100)
pixelRing_A6.show()
time.sleep(0.015)
elif note == “G”:
for level in range(5, 40):
pixelRing_A2.fill((0x99D2DE))
pixelRing_A2.brightness = float(level / 100)
pixelRing_A2.show()
pixelRing_A5.fill((0x99D2DE))
pixelRing_A5.brightness = float(level / 100)
pixelRing_A5.show()
for level in range(40, 5, -1):
pixelRing_A5.brightness = float(level / 100)
pixelRing_A5.show()
pixelRing_A2.brightness = float(level / 100)
pixelRing_A2.show()
time.sleep(0.015)
Step 8: Interact with edelweiss
- Play “Edelweiss” using this tone generator
- This is the sheet music:
