For the final project, I attempted to make a device that captures the “shakes” of the internet. The work samples live twitter data and looks for tweets that match a set of keywords; any words that fit this register as “tremors” and are outputted as oscillations of a servo, captured on a turning spool of paper. Here is a video going into detail on some of the more important parts of the code and how it was constructed (more information will be written below) as well as some footage of the machine functioning.
To build this, I used a lot of scraps of material in my garage. As such, a lot of parts here are entirely arbitrary, chosen only because they were what was around. I highly recommend copying the idea over the execution if you’re looking to experiment with this. Nevertheless, the materials I used (as much as I know about them) are below:
- A 2ft square piece of plywood
- One 2ft long roll of paper
- A long, 3/4inch piece of PVC pipe
- Various pieces of leftover lumber; literally anything will do as long as it’s strong and you can cut it consistently.
- One slide rail (I would link something similar but I have literally no idea where this came from)
- two metal L-bends from an old Erector set and the screws from the same kit; these can be replaced with literally anything that fits the aforementioned slide rail
- A Water Brush
- Velcro
- Assorted screws (largely 1/4 inch and 3/4 inch)
- A few, small nails
- Duck Tape
- A Circuit Playground and Crikit
- Two servos, one of which should be wired (or hacked) for continuous rotation.
As to tools you need, it will largely depend on what parts you end up using. As I worked largely with wood, a good drill and jigsaw were essential. I also used a hacksaw occasionally when the jigsaw was overkill. A screwdriver was also useful when I was working with mounting my slide to the wooden frame, just to avoid damaging it. If you work with something other than wood, your list of tools will widely change.
With that hodgepodge of parts, I started with the piece of plywood:
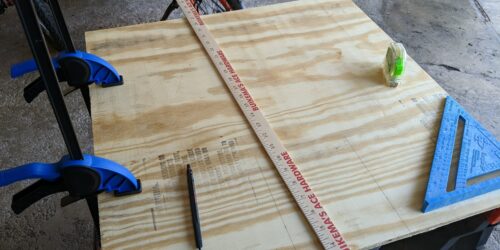
As my roll of paper was the same length as this plywood, I needed to re-arrange it. I cut six inches out from the center of the piece using a jigsaw, spitting it into three. I cut the middle section in half, rotated each section, and used it to span the gap between the two unaltered pieces. This created a hole in the middle but stretched the board out to twenty-eight inches long, four extra inches when compared to the roll of paper.
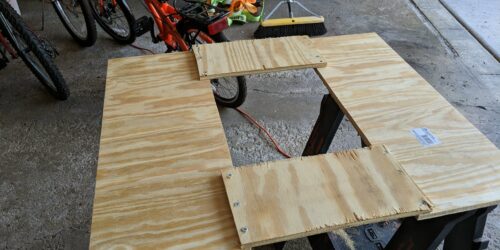
To actually attach this, I simply used 1/4 inch screws. The wood was soft enough I didn’t need to pre-drill a hole; you can simply press the nail into the plywood with the drill and then use the screw itself to drive into the board. With the extra space that this provided, I had enough room to attach what would become holders for the two spools:
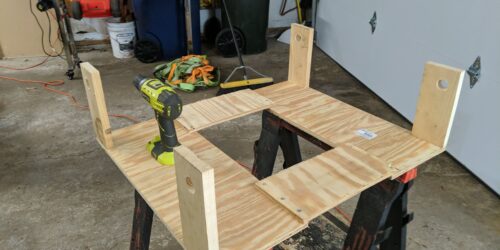
The four pieces of wood here came from four scrap pieces of the same height. I clamped them together in pairs to drill a starter hole, then drilled 1 inch holes in each. By clamping them in pairs, I ensured that the pairs would have holes at the same height and position, to get straight axles. Once I had those pairs, I screwed them into the corners through the bottom. Since this wood (I think it is pine?) is rather dense, I clamped each piece onto the plywood as tight as I could, then drilled a hole for the first screw and only then screwed in the board, still clamped. I have had issues with this kind of wood popping off the board it is supposed to be attached to rather than properly screwing in. After all that trouble, the board won’t come off anymore, so you can drill more holes and insert more screws much easier. I did three screws in a line for each support. As a bonus, the clamps made it easy to ensure these were mounted at a right angle, seeing as the pressure forced them to end up straight regardless. When making these supports, the only requirement is that the holes in them are taller than half
With these attached, I could turn to the axles:
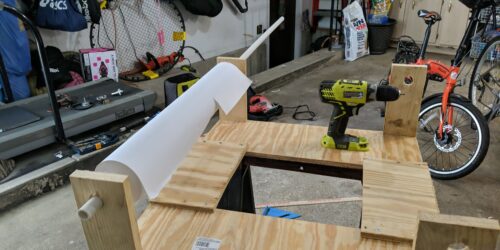
My axles are just 3/4 inch PVC pipe. Here you can see the whole pipe before I split it in two. In the end, each was 33 inches long, providing plenty of excess on either side. All I needed here was to slide the two axles into the existing holes and then the basic frame was mostly complete. The last piece was an extension to mount my linear slide on:
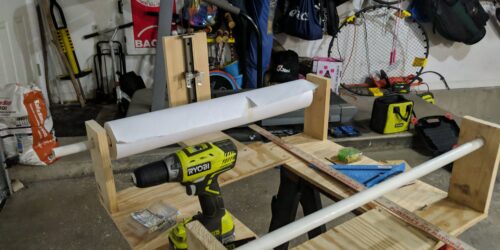
I took another two pieces of the same scrap wood and made them into an L. I attached one end of the L to the plywood on the side I had arbitrarily decided was the side the paper spool sat on. On the face of the other, I mounted my linear slide with a few screws through holes in it’s face. This part isn’t essential, but I found it very useful, as it is later the place where I mounted my servo. It allowed me to slide it up and down to fine tune the positioning of the pen. If you don’t have this part, you may have to be more precise with your servo positioning, or make some sort of arm that will fall under gravity so it can rest on the paper.
To mount your two servos, I recommend you look at my video for a better view. The continuous rotation servo was taped onto the front axle (the one without the spool of paper). To help it stick, I pushed very small, finishing nails through the holes in its horn which stuck out over the pipe. This just served to provide something for the tape to stick to. The drawing servo was velcro-ed to the linear slide; I was able to mount Erector set pieces to support it and then simply secured it with wrapped around velcro. As I suspect you will have another slide, I recommend finding your own attachment scheme. As long as you can mount the servo so it can rotate freely, then everything should work fine.
On the software side of things, this is, ironically, a lot more complete. There’s two parts, the Processing side of things that handles sampling Twitter data, and the Arudino code that handles moving the motors. I’ll put both below with a short explanation before each piece of code, but it is (hopefully) fairly self explanatory.
On the Processing side of things, we first have a small class that creates a floating average. It handles this with a queue of items, which it keeps track of the sum of.
class floatingAvg
{
private Queue<Double> vals;
private double sum;
private boolean inUse;
private int count;
public floatingAvg(int n)
{
vals = new ArrayDeque<Double>();
count = n;
inUse = false;
}
// adds the next value
public void next(double score)
{
inUse = true;
sum += score;
vals.add(score);
// if we have too many values, pop it
if (vals.size() > count)
{
double temp = vals.poll();
sum -= temp; // subtract it from the sum
}
inUse = false;
}
public double getAverage()
{
return sum / vals.size();
}
public boolean getInUse()
{
return inUse;
}
}
The main Processing code is below. The communication with the Arduino is handled in the draw function. Analyzing Twitter data is done via the combStream method. I should note, I removed my authentication keys for my Twitter API access.
import twitter4j.conf.*;
import twitter4j.api.*;
import twitter4j.*;
import java.util.*;
import processing.serial.*;
ConfigurationBuilder cb;
Query query;
Twitter twitter;
// an average calculator
floatingAvg average;
// way to check if avg is equal
double lastAVG;
double subMod = 0;
// frame usage
boolean hidden = false;
// a serial port
Serial myPort;
void setup() {
//relatedCount = totalCount = 0;
average = new floatingAvg(250);
/*
// list ports
for (String s : Serial.list())
{
System.out.println(s);
}
*/
myPort = new Serial(this, “COM8”, 115200);
//thread(“combStream”);
combStream();
}
void draw()
{
// hides little square window
if(!hidden) {
surface.setVisible(false);
hidden = true;
}
if (!average.getInUse())
{
double outputAVG; // final result
double currentAVG = average.getAverage();
if (currentAVG == lastAVG)
{
// subtracts submod
subMod -= 0.01 * currentAVG;
outputAVG = currentAVG + subMod; // deadens avg over time to fade out
}
else
{
// output new number and reset
outputAVG = currentAVG;
subMod = 0;
lastAVG = currentAVG;
}
/*
//debug
System.out.print(frameCount);
System.out.print(” “);
System.out.print(constrain((int) (outputAVG * 10), 0, 254));
System.out.print(” “);
System.out.print(outputAVG);
System.out.print(” “);
System.out.println(average.getAverage());
*/
myPort.write((byte) constrain((int) (outputAVG * 10), 0, 254));
}
else
{
System.out.println(“IN USE”);
}
}
void combStream() {
//sets up a twitter stream and starts it
cb = new ConfigurationBuilder(); //Acreditacion
cb.setOAuthConsumerKey(“”);
cb.setOAuthConsumerSecret(“”);
cb.setOAuthAccessToken(“”);
cb.setOAuthAccessTokenSecret(“”);
cb.setUserStreamRepliesAllEnabled(false);
//sets up a stream with a custom listener
TwitterStream twitterStream = new TwitterStreamFactory(cb.build()).getInstance();
StatusListener listener = new StatusListener() {
public void onStatus(Status status) { //important one!
//splits status
String[] words = status.getText().split(“\\W”);
// a set of all valid words we are looking for (case insensetive)
TreeSet<String> matches = new TreeSet<String>(String.CASE_INSENSITIVE_ORDER);
//Covid terms (~1.2% on the 16th of April, 2020)
matches.add(“COVID-19”);
matches.add(“Corona”);
matches.add(“virus”);
matches.add(“pandemic”);
matches.add(“quarentine”);
matches.add(“isolation”);
//for every word, checks if it matches
int count = 0;
for (String word : words)
{
if (matches.contains(word))
{
++count;
}
}
//if this is a valid word, add to the global count
if (count > 0)
{
//formula for “rating” the importance of a tweet; someone with more followers is more important
double rating = count * (status.getUser().getFollowersCount() + status.getUser().getListedCount());
//shake += rating;
//right now, we just add one
average.next(rating);
}
else
{
average.next(0); // if it didn’t score we’ll “deaden” things a tad
}
}
public void onDeletionNotice(StatusDeletionNotice statusDeletionNotice) {}
public void onTrackLimitationNotice(int numberOfLimitedStatuses) {}
public void onException(Exception ex) {
ex.printStackTrace();
}
public void onStallWarning(StallWarning w) {}
public void onScrubGeo(long a, long b) {}
};
twitterStream.addListener(listener);
//gets 1% of all tweets with language EN
twitterStream.sample(“en”);
}
For the Arduino, the code is much simpler, as everything heavy is done via Processing. It has a smaller floating average and, every cycle, checks if it can update that average with new data, and writes a new position to the drawing servo based on that average.
#include “Adafruit_Crickit.h”
#include “seesaw_servo.h”
#include <AccelStepper.h>
Adafruit_Crickit crickit;
seesaw_Servo driveServo(&crickit); // create servo object to control a servo
seesaw_Servo wiggleServo(&crickit);
// processing input line
uint8_t Pinput;
// sets up ANOTHER floating average on this side
const int numReadings = 15;
int readings[numReadings];
int readIndex = 0;
int total = 0;
int average = 0;
void setup() {
Serial.begin(115200);
if (!crickit.begin()) {
Serial.println(“ERROR!”);
while (1);
}
else Serial.println(“Crickit started”);
driveServo.attach(CRICKIT_SERVO1); // attaches the servo to CRICKIT_SERVO1 pin
wiggleServo.attach(CRICKIT_SERVO2);
driveServo.write(65);
//initializes all readings to zero
for (int i = 0; i < numReadings; ++i)
{
readings[i] = 0;
}
//ensures we don’t have unitialized variables
Pinput = 0;
}
void loop() {
// only does get’s new data if available
if (Serial.available() > 0)
{
// ensures servo is written to at start
driveServo.write(48);
Pinput = Serial.read();
// subtract the last reading:
total = total – readings[readIndex];
// add new value
readings[readIndex] = Pinput;
// add the reading to the total:
total = total + readings[readIndex];
// advance to the next position in the array:
readIndex = readIndex + 1;
// if we’re at the end of the array…
if (readIndex >= numReadings) {
// …wrap around to the beginning:
readIndex = 0;
}
average = total / numReadings;
}
// * (1.5 – average / 254.0) — loved the effect but too crazy
// waves servo
double pos = random(0, average/8) – (average / 16) +
(average / 254.0 * 90.0) *
sin(((millis() + ((random(0, average)) / 10.0))/ 450.0)); // slow
wiggleServo.write((90 + pos));
}