Introduction
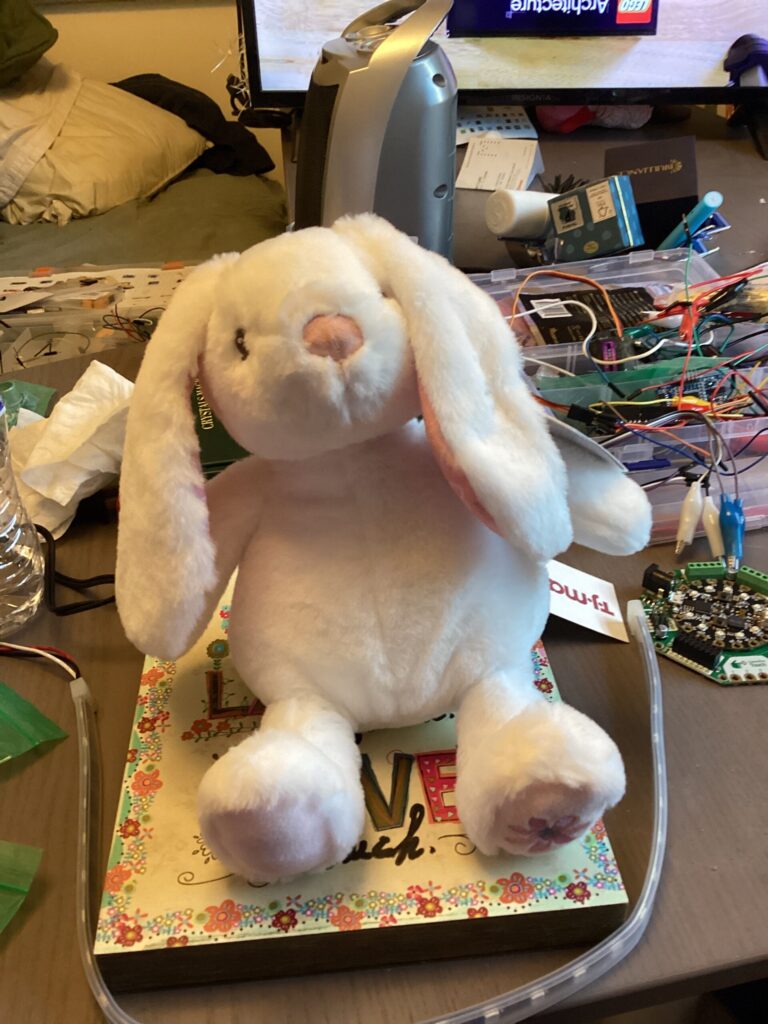
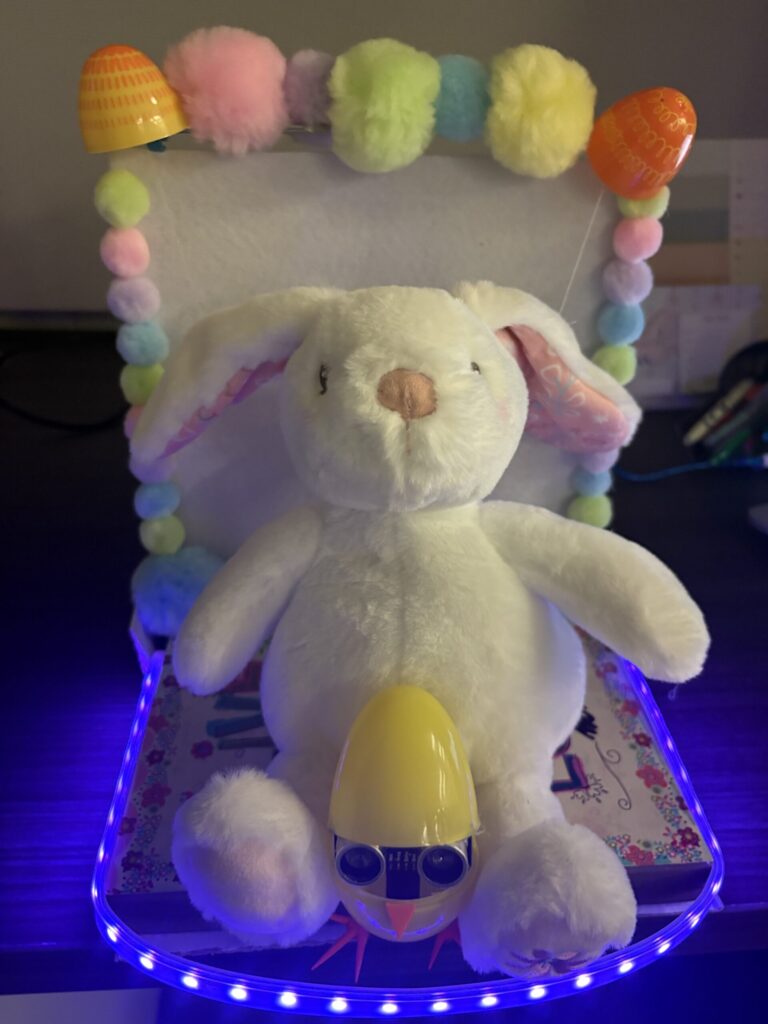
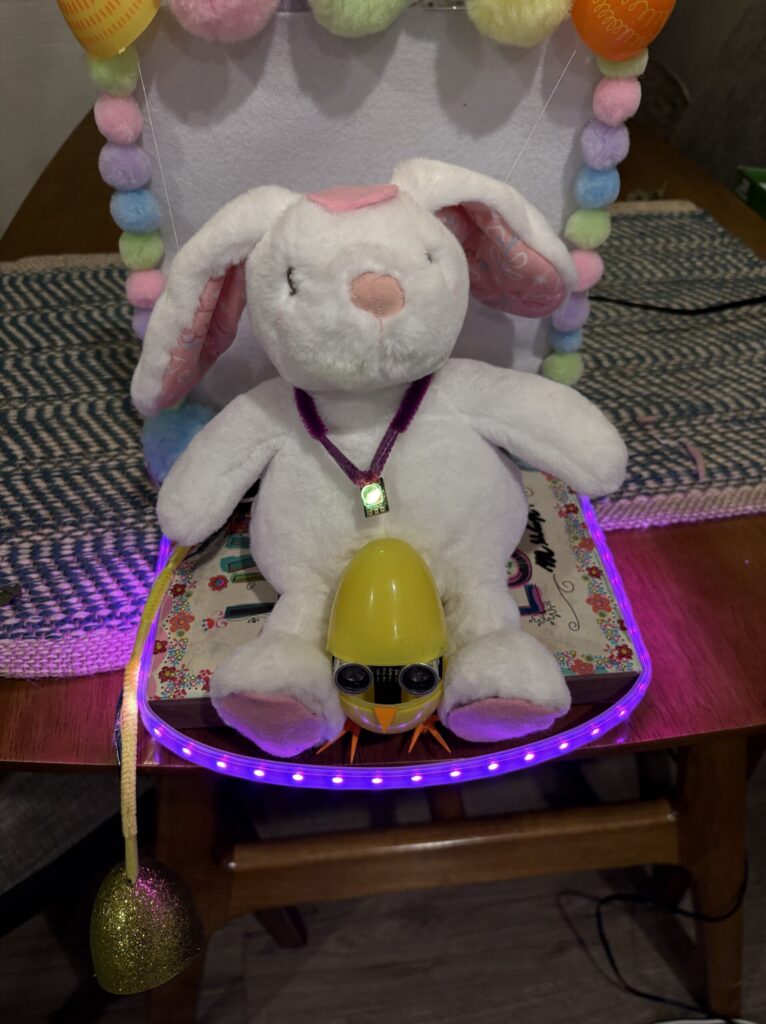
My project is an interactive “Eavesdrop Bunny” that reacts to both movement and sound. An ultrasonic sensor senses as someone approaches and servo motors are triggered and they lift both of the bunny’s ears up. Additionally, a microphone tracks the loudness of the environment and the microphone output is used to determine the color displayed on the neopixel strip.
The purpose between creating Eavesdrop Bunny was to create a cute decoration that reminds you itself that it exists. I always buy cute things for my room but they end up blending in and I don’t appreciate them. The eavesdrop bunny will raise his ears up every time I’m close to encourage me to interact with him. I also dance quite often so I like the idea of the bunny neopixel strip reacting to my music, it’s as if we are enjoying the music together.
Materials
General
- Wires
- Soldering iron + solder
- Hot glue
- Wood glue
- Clear tape
- Electrical tape
- White thread + needle
- Scissors
Electronics
- Arduino Uno R3
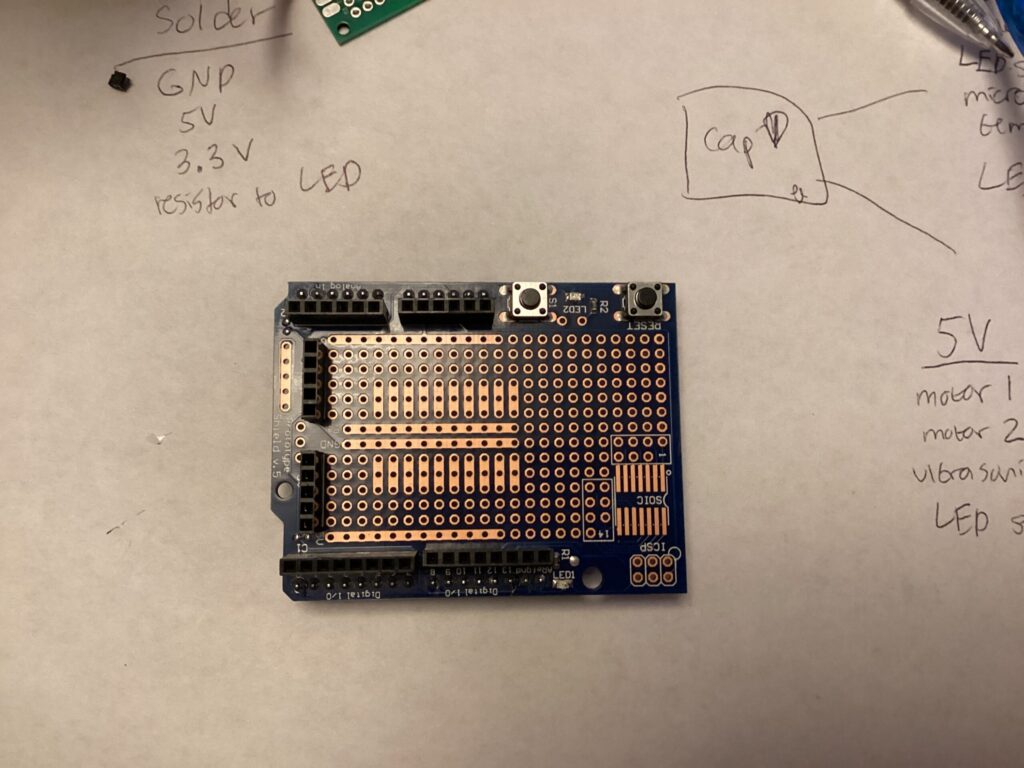
- Arduino Uno proto shield
- NeoPixel strip
- MAX4466 microphone
- 2 × Servo motors
- HC-SR04 ultrasonic sensor
- 5V 4A power supply
- 100 µF capacitor
Bunny Stand
- Decorative wooden sign (base)
- Plush bunny
- 2 × Jenga blocks
- 4 × wooden craft cubes
- Large metal handle (drawer handle)
- 2 × hanger-size plastic clips (used as stoppers)
- Small craft wood planks
- Shoebox lid
Decor
- Plastic Easter eggs
- Colorful pom-poms
- White felt
- Orange foam sheet
Step 1: Build the Base
- Start with your decorative wooden sign as the base.
- Drill a hole near the front for sensor wiring.
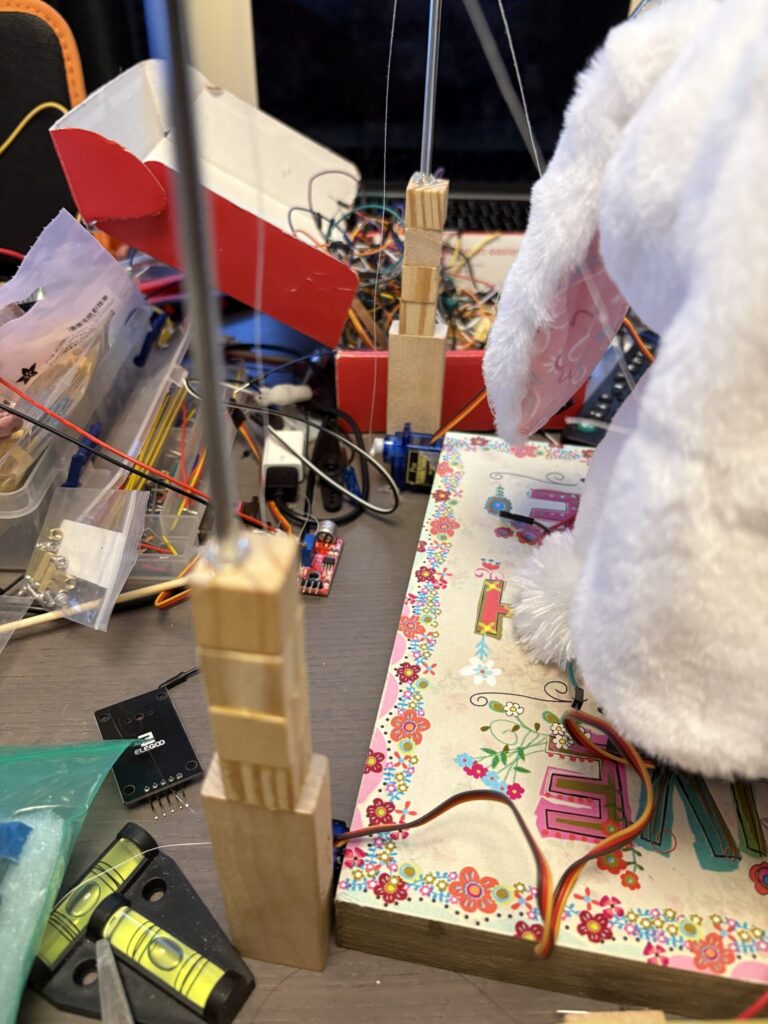
Create Support Posts
- Glue 4 wooden cubes vertically onto a Jenga block → make 2 identical posts.
- Glue both posts onto the base (left and right sides).
- Drill a hole through the top cube of each post.
Add the Handle Frame
- Insert the metal handle into both holes → acts as a horizontal bar.
Bunny Support
- Glue an L-shaped wood piece onto the base.
- Place the plush bunny against it.
- Add a small perpendicular wood piece to push the bunny’s head forward.
Step 2: Create the Ear-Lifting Mechanism
- Hot glue one servo inside each wooden post (facing inward).
Attach the Ears
- Use a needle to poke a hole in each ear.
- Tie white thread securely to each ear.
Routing the Thread
- Run each thread:
- Up over the metal handle
- Down to the corresponding servo horn
- Add stoppers on the handle (using hanger clips) to keep thread aligned.
Motion Setup
- Default: servo arms point up
- When triggered: servos rotate downward → pull thread → ears lift up
Step 3: Add Distance Sensing
- Place the HC-SR04 ultrasonic sensor inside a plastic Easter egg.
- Drill a hole in the egg for wires.
- Glue the egg partially closed (don’t block the sensor).
- Feed wires through the base hole.
- Glue the egg to the front of the base between the bunny’s legs.
Step 4: Add Sound Reaction + Lighting
- Hot glue the MAX4466 microphone behind the bunny.
- Attach the NeoPixel strip:
- Along the front and both sides of the base with clear tape
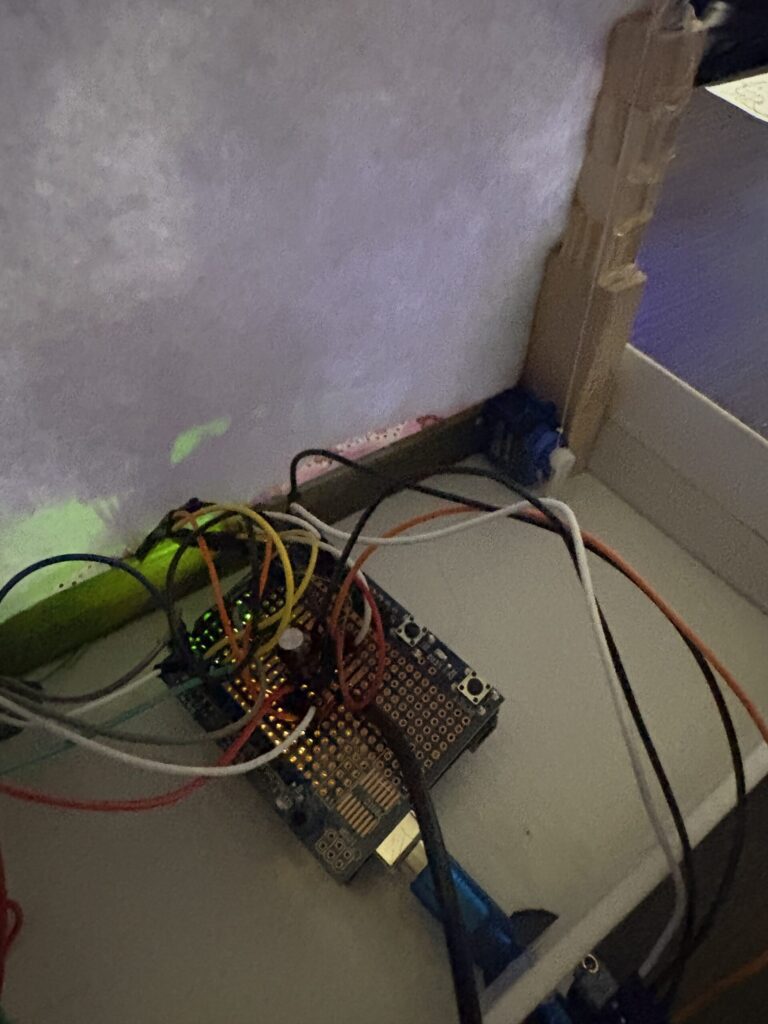
Step 5: Wiring Everything
- Use an Arduino Uno with proto shield.
Power Setup
- 5V power supply → servos + NeoPixels + ultrasonic sensor
- 3.3V → microphone
- Add 100 µF capacitor across power rails
Grounding
- Solder all grounds to a common GND rail
Connections
- Power lines → soldered
- Data lines → plugged into Arduino pins
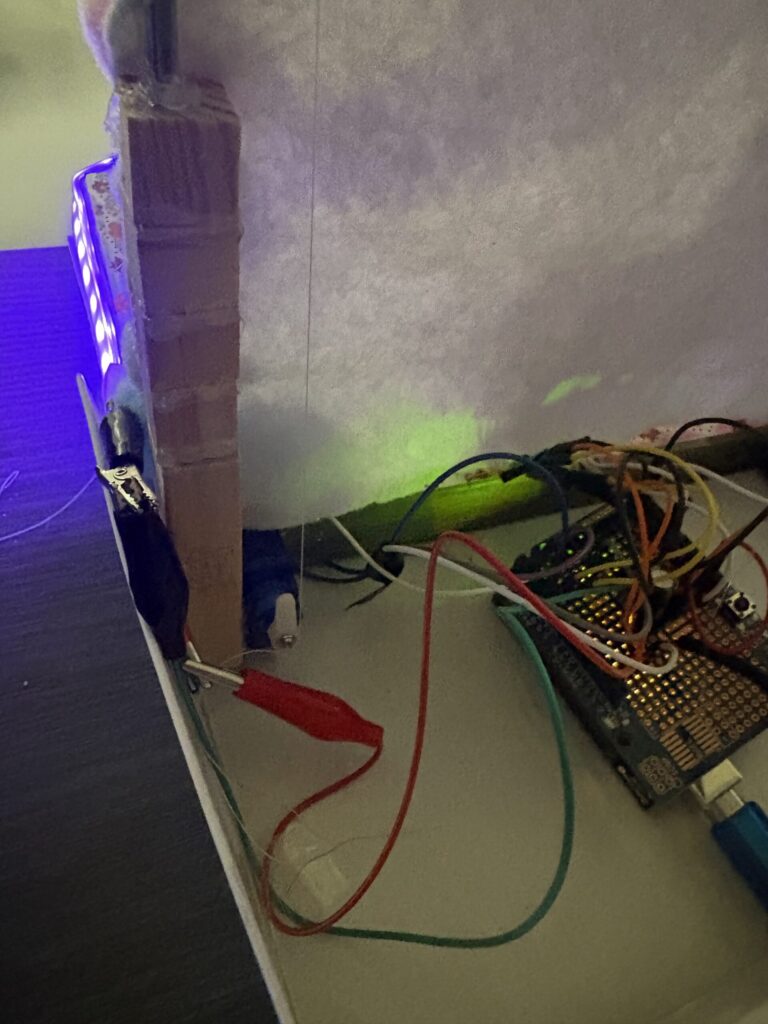
NeoPixel Tip
- Use alligator clips for easy attachment to strip
Step 6: Enclosure
- Place everything into a shoebox lid:
- Arduino sits inside
- Bunny base sits on top
- Cut out the sides so bunny is visible
Step 7: Decorate
- Cover posts + handle with white felt (hides thread)
- Glue plastic egg tops over stoppers
- Add colorful pom-poms around edges and top
- Cut shishkebab stick into 4 pieces and glue them together in the shape of a chicken leg x2. Paint orange.
- Cut a triangle piece of orange foam
- Hot glue chicken legs and chicken beak(foam) onto yellow egg with ultrasonic sensor

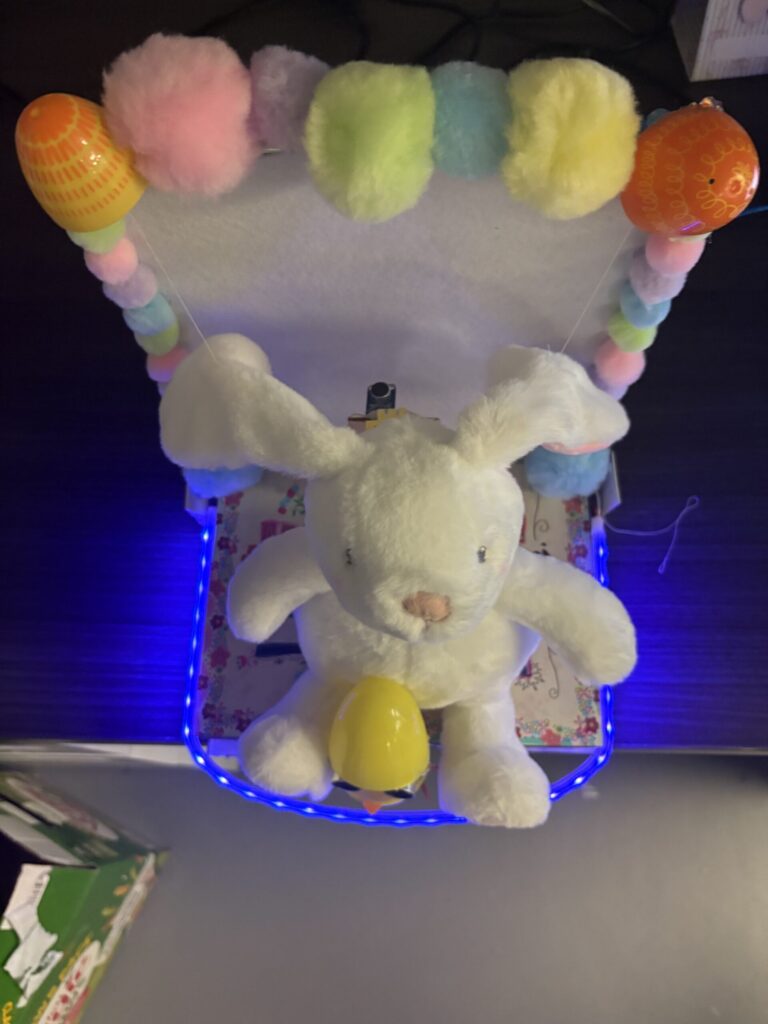
Interactive Bunny Update:
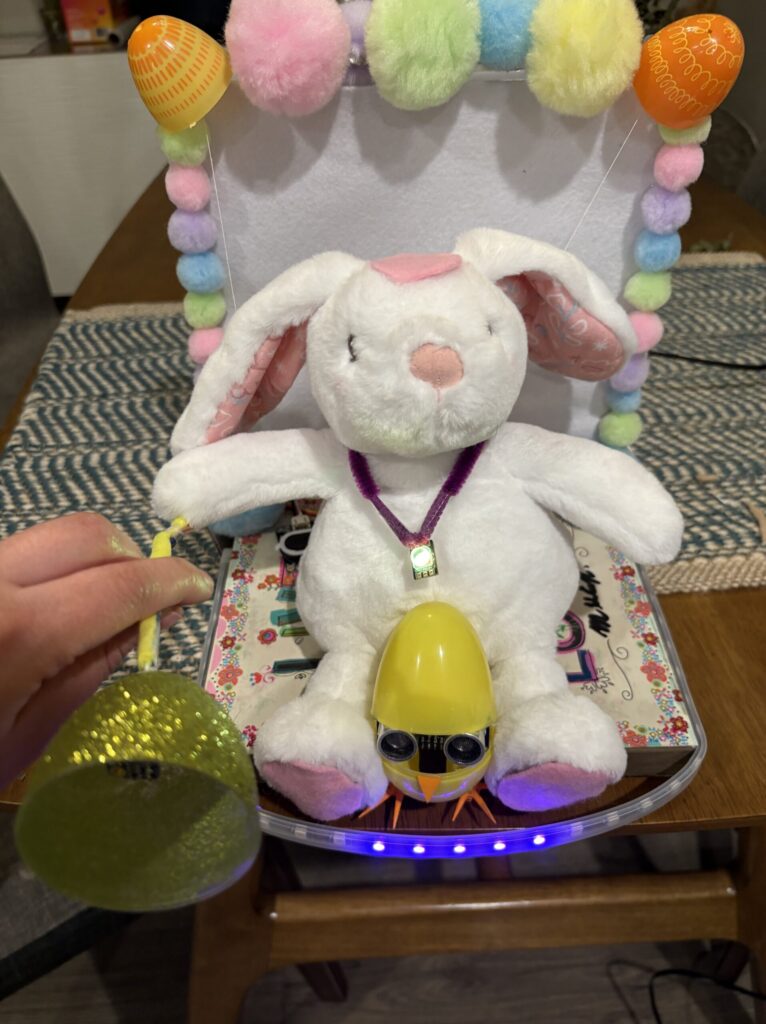
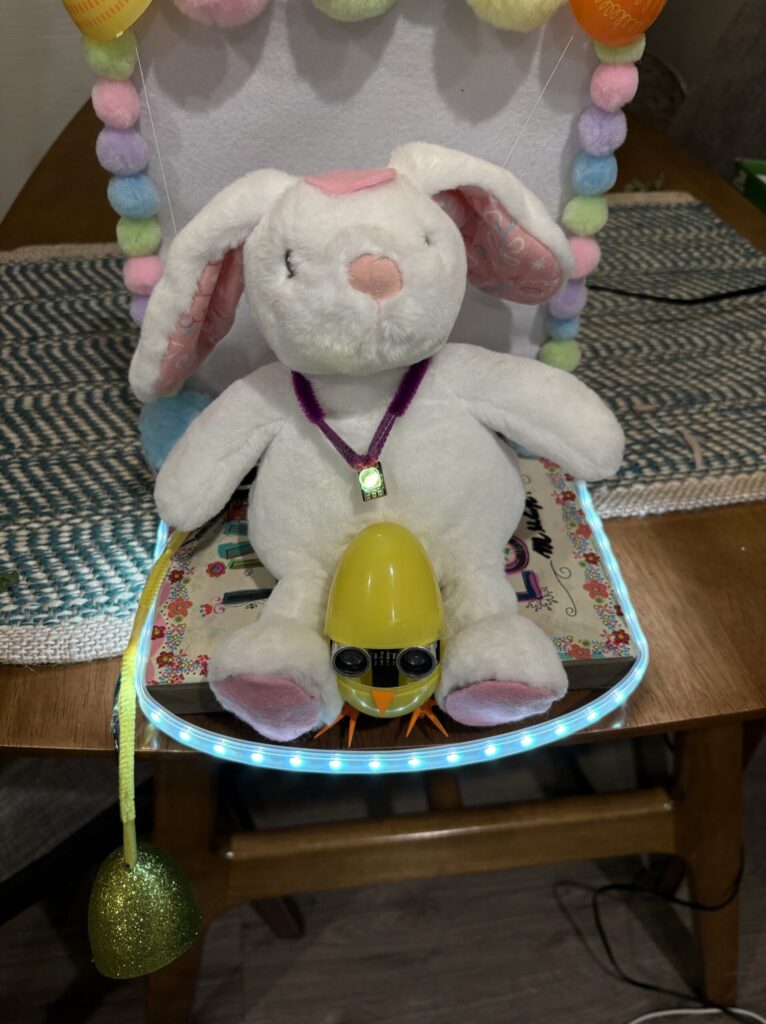
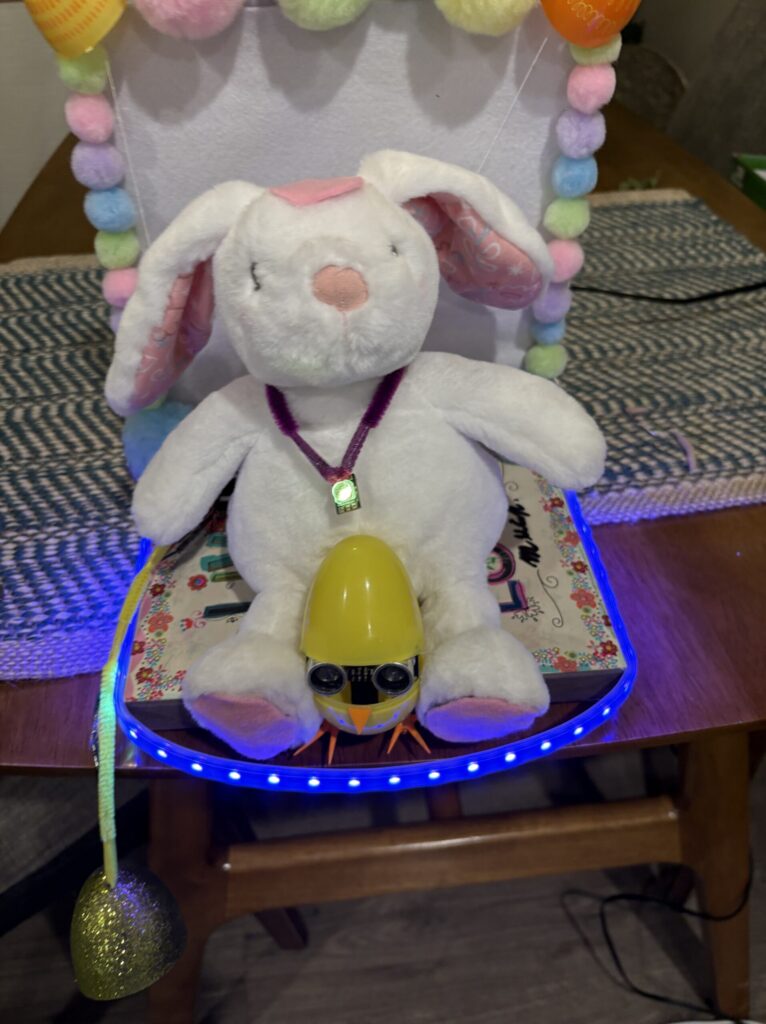
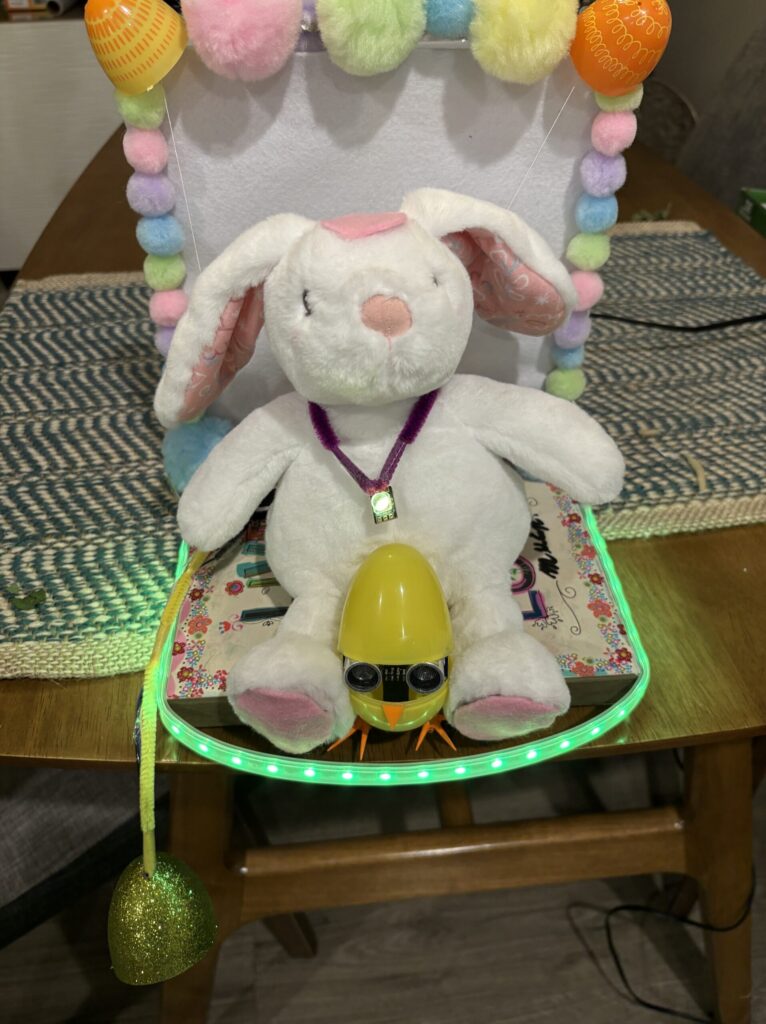
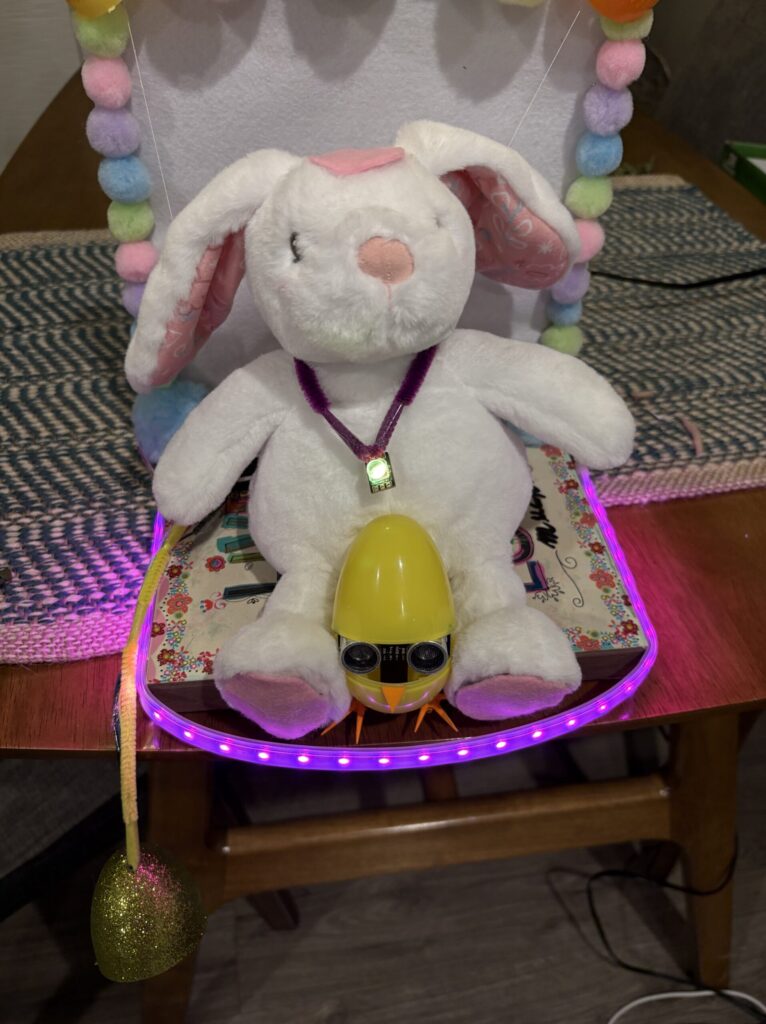
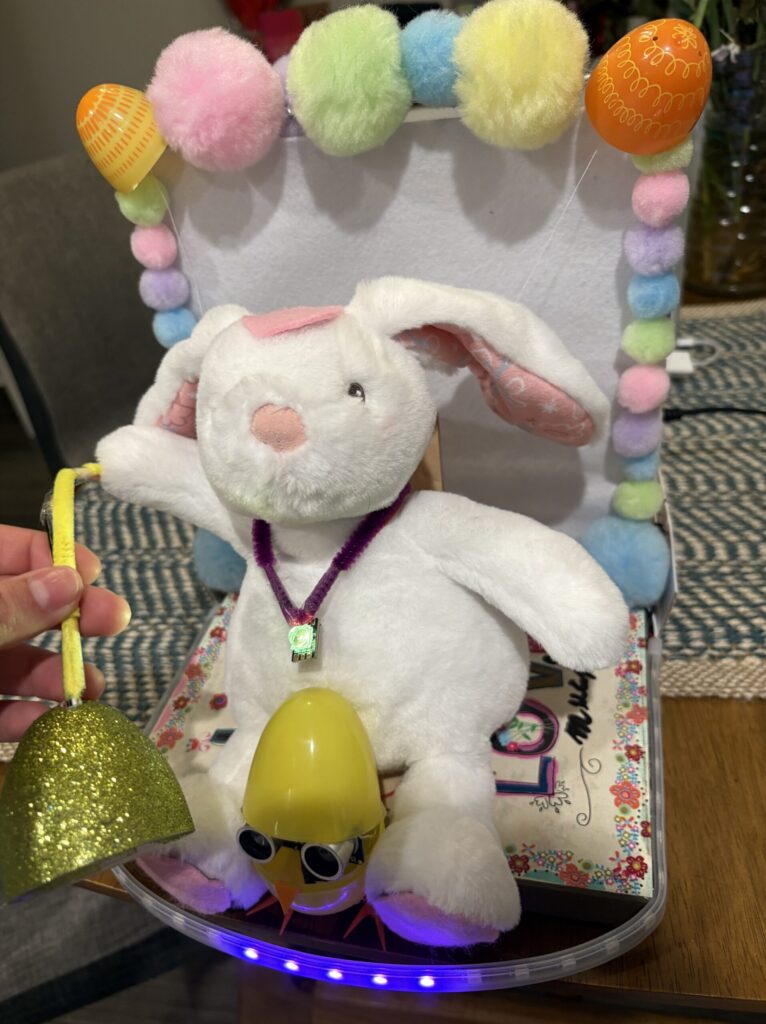
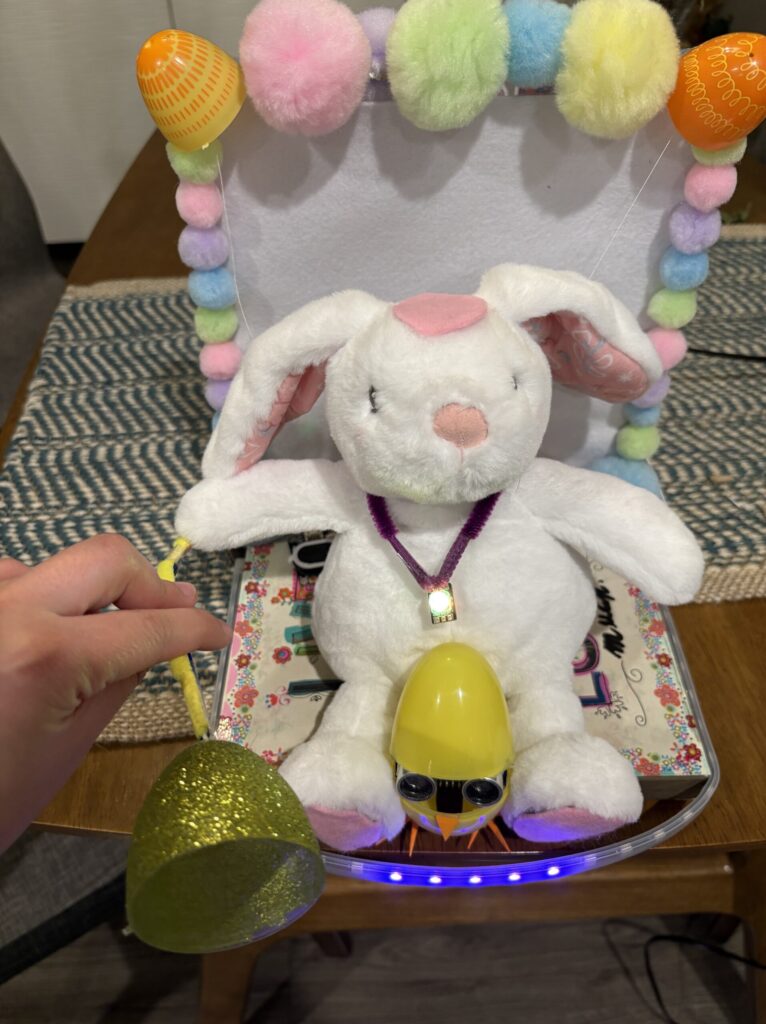
When I completed the first first of Eavesdrop bunny, I noticed I had grown quite attached to him. I wanted the additions I make to reflect what a real friendship is like. Personally, when a good friend is talking to me, I feel like I’m literally warming up on the inside. I wanted to visualize that by attaching an egg you speak into to the base and a necklace on the bunny. The egg contains a temperature sensor and the temperature is mapped to an LED on the necklace which changes from yellow to orange to red.
The other addition I made signifies the importance of having boundaries with your friends. I attached capacitive sensors to the bunny and depending on whether it is a “yes pet me there” zone or “don’t touch me zone”, a speaker on the base plays a happy sound or an upset buzz.
Materials for Updated Bunny:
- speaker that came with kit and amplifier
- Plastic eggs
- Pipe cleaners
- Pink Felt
- Conductive fabric
- Single neopixel LED
- temperature sensor
Step 1: Temperature Sensor and LED
- Drill a small hole in a plastic Easter egg
- Place the temperature sensor inside the egg
- Run the wires out through the hole
- Tape a pipe cleaner along the wires to hide them
- Wire a single NeoPixel LED
- Place the LED around the bunny’s neck
- Secure the wires so it looks like a necklace
- Attach a pipe cleaner to the LED wires for appearance
- Use the FastLED library
- Program the LED to change color based on temperature:
- Yellow → Orange → Red
- Make the color transitions smooth
Step 2: Capacitive Touch and Speaker
- Wire the speaker
- Use a small screwdriver to adjust the volume with the potentiometer
Feet (no-pet zones):
- Connect one wire from a digital pin to a resistor
- Connect another wire from the resistor to a second digital pin
- Solder extra wires to the signal side of the resistor
- Route wires to the base of the bunny (under each foot)
- Cut conductive fabric to match paw shapes
- Make a small hole and thread the signal wire through
- Glue conductive fabric to each paw
- Cut pink felt in the same shape
- Glue felt over the conductive fabric
Head (petting zone):
- Add one signal wire to the top of the head
- Repeat fabric + felt layering process
Sound behavior:
- Touching feet → low frequency buzz (disapproval)
- Petting head → melody plays
- Melody is adapted from code found on GitHub using tone()
Step 3: Additional Changes
- Increase microphone gain to make it more sensitive
- Update NeoPixel strip behavior:
- Start with only middle LEDs on
- As sound continues, more LEDs light up
- Creates a gradual increase based on noise over time
/* REMEMBER:
A5: SCL (Clock)
A4: SDA (Data)
BUNNY:
YES ZONES: between the eyes, on the FOREHEAD, and behind the ears
NO-NO ZONES: belly, feet, and tail
*/
//CONTINUE HERE:
// mapped sound amount to number of leds but one on one side always not reached?
#include <Servo.h>
#include <Adafruit_NeoPixel.h>
#include “Adafruit_MCP9808.h”
#include <CapacitiveSensor.h>
#define TRIG_PIN 2 // output TO ultrasonic sensor
#define ECHO_PIN 4 // output FROM ultrasonic sensor
#define SOUND_PIN A0 //input from microphone
#define NUM_LEDS 30 //on neopixel strip
#define LED_PIN 3
#define SAMPLE_WINDOW 50 // Sample window width in mS
#define TEMP_LED_PIN 7
#define TEMP_LED_COUNT 1
#define SERVO1 5
#define SERVO2 6
//ANYTHING SUPER MARIO MELODY RELATED FROM HERE -> https://github.com/robsoncouto/arduino-songs?utm_source=chatgpt.com
#define NOTE_B0 31
#define NOTE_C1 33
#define NOTE_CS1 35
#define NOTE_D1 37
#define NOTE_DS1 39
#define NOTE_E1 41
#define NOTE_F1 44
#define NOTE_FS1 46
#define NOTE_G1 49
#define NOTE_GS1 52
#define NOTE_A1 55
#define NOTE_AS1 58
#define NOTE_B1 62
#define NOTE_C2 65
#define NOTE_CS2 69
#define NOTE_D2 73
#define NOTE_DS2 78
#define NOTE_E2 82
#define NOTE_F2 87
#define NOTE_FS2 93
#define NOTE_G2 98
#define NOTE_GS2 104
#define NOTE_A2 110
#define NOTE_AS2 117
#define NOTE_B2 123
#define NOTE_C3 131
#define NOTE_CS3 139
#define NOTE_D3 147
#define NOTE_DS3 156
#define NOTE_E3 165
#define NOTE_F3 175
#define NOTE_FS3 185
#define NOTE_G3 196
#define NOTE_GS3 208
#define NOTE_A3 220
#define NOTE_AS3 233
#define NOTE_B3 247
#define NOTE_C4 262
#define NOTE_CS4 277
#define NOTE_D4 294
#define NOTE_DS4 311
#define NOTE_E4 330
#define NOTE_F4 349
#define NOTE_FS4 370
#define NOTE_G4 392
#define NOTE_GS4 415
#define NOTE_A4 440
#define NOTE_AS4 466
#define NOTE_B4 494
#define NOTE_C5 523
#define NOTE_CS5 554
#define NOTE_D5 587
#define NOTE_DS5 622
#define NOTE_E5 659
#define NOTE_F5 698
#define NOTE_FS5 740
#define NOTE_G5 784
#define NOTE_GS5 831
#define NOTE_A5 880
#define NOTE_AS5 932
#define NOTE_B5 988
#define NOTE_C6 1047
#define NOTE_CS6 1109
#define NOTE_D6 1175
#define NOTE_DS6 1245
#define NOTE_E6 1319
#define NOTE_F6 1397
#define NOTE_FS6 1480
#define NOTE_G6 1568
#define NOTE_GS6 1661
#define NOTE_A6 1760
#define NOTE_AS6 1865
#define NOTE_B6 1976
#define NOTE_C7 2093
#define NOTE_CS7 2217
#define NOTE_D7 2349
#define NOTE_DS7 2489
#define NOTE_E7 2637
#define NOTE_F7 2794
#define NOTE_FS7 2960
#define NOTE_G7 3136
#define NOTE_GS7 3322
#define NOTE_A7 3520
#define NOTE_AS7 3729
#define NOTE_B7 3951
#define NOTE_C8 4186
#define NOTE_CS8 4435
#define NOTE_D8 4699
#define NOTE_DS8 4978
#define REST 0
//these 2 are for mapping total sound to 3 of LEDs
#define BASE_AMOUNT 400
#define INCREMENT 200
// [change this to make the song slower or faster] -github
int tempo = 200;
// super mario melody
int melody[] = {
// Super Mario Bros theme
// Score available at https://musescore.com/user/2123/scores/2145
// Theme by Koji Kondo
NOTE_E5,8, NOTE_E5,8, REST,8, NOTE_E5,8, REST,8, NOTE_C5,8, NOTE_E5,8, //1
NOTE_G5,4, REST,4, NOTE_G4,8, REST,4,
NOTE_C5,-4, NOTE_G4,8, REST,4, NOTE_E4,-4, // 3
NOTE_A4,4, NOTE_B4,4, NOTE_AS4,8, NOTE_A4,4,
NOTE_G4,-8, NOTE_E5,-8, NOTE_G5,-8, NOTE_A5,4, NOTE_F5,8, NOTE_G5,8,
REST,8, NOTE_E5,4,NOTE_C5,8, NOTE_D5,8, NOTE_B4,-4,
NOTE_C5,-4, NOTE_G4,8, REST,4, NOTE_E4,-4, // repeats from 3
NOTE_A4,4, NOTE_B4,4, NOTE_AS4,8, NOTE_A4,4,
NOTE_G4,-8, NOTE_E5,-8, NOTE_G5,-8, NOTE_A5,4, NOTE_F5,8, NOTE_G5,8,
REST,8, NOTE_E5,4,NOTE_C5,8, NOTE_D5,8, NOTE_B4,-4,
REST,4, NOTE_G5,8, NOTE_FS5,8, NOTE_F5,8, NOTE_DS5,4, NOTE_E5,8,//7
REST,8, NOTE_GS4,8, NOTE_A4,8, NOTE_C4,8, REST,8, NOTE_A4,8, NOTE_C5,8, NOTE_D5,8,
REST,4, NOTE_DS5,4, REST,8, NOTE_D5,-4,
NOTE_C5,2, REST,2};
// sizeof gives the number of bytes, each int value is composed of two bytes (16 bits)
// there are two values per note (pitch and duration), so for each note there are four bytes
int notes = sizeof(melody) / sizeof(melody[0]) / 2;
// this calculates the duration of a whole note in ms
int wholenote = (60000 * 4) / tempo;
int divider = 0, noteDuration = 0;
//first is signal second is receiver. signal wire attached on resistor on receiver side.
CapacitiveSensor cs_9_8 = CapacitiveSensor(9,8);
CapacitiveSensor cs_11_12 = CapacitiveSensor(11,12);
const int speakerPin = 10;
long total2; //total good petting touch before bunny plays happy music aka super mario
//ULTRASONIC tutorial:
//https://www.hackster.io/abdularbi17/ultrasonic-sensor-hc-sr04-with-arduino-tutorial-327ff6
long duration; // variable for the duration of sound wave travel
int distance; // variable for the distance measurement
//https://docs.arduino.cc/built-in-examples/analog/Smoothing/?queryID=undefined
//SMOOTHING TUTORIAL
const int numReadings = 10;
int readings[numReadings]; // the readings from the analog input
int readIndex = 0; // the index of the current reading
int total = 0; // the running total
int average = 0; // the average
int ear_angle;
//SERVOS
Servo myservo;
Servo myservo2;
unsigned long lastReadingTime = 0;
//NEOPIXELS
Adafruit_NeoPixel strip = Adafruit_NeoPixel(NUM_LEDS, LED_PIN , NEO_GRB + NEO_KHZ800);
Adafruit_NeoPixel tempPixel = Adafruit_NeoPixel(TEMP_LED_COUNT, TEMP_LED_PIN, NEO_GRB + NEO_KHZ800);
int activeLEDs = 3;
//TEMP SENSOR
Adafruit_MCP9808 tempsensor = Adafruit_MCP9808();
float f = 67; //default
float smoothTemp = 67;
unsigned long lastTempTime = 0;
//MICROPHONE
int totalSound;
void setup() {
Serial.begin(9600);
strip.begin();
strip.setBrightness(50);
tempPixel.begin();
tempPixel.setBrightness(50);
pinMode(TRIG_PIN, OUTPUT); // Sets the TRIG_PIN as an OUTPUT
pinMode(ECHO_PIN, INPUT); // Sets the ECHO_PIN as an INPUT
pinMode(SOUND_PIN, INPUT);
digitalWrite(TRIG_PIN, LOW);
myservo.attach(SERVO1);
myservo2.attach(SERVO2);
//Servo starting angles
myservo.write(30);
myservo2.write(150);
//myservo.detach();
//myservo2.detach();
total2 = 0;
cs_9_8.set_CS_AutocaL_Millis(0xFFFFFFFF); //needed for petting motion to be sensed?
cs_11_12.set_CS_AutocaL_Millis(0xFFFFFFFF);
for (int thisReading = 0; thisReading < numReadings; thisReading++) {
readings[thisReading] = 0;
}
if (!tempsensor.begin(0x18)) {
Serial.println(“Couldn’t find MCP9808! Check your connections and verify the address is correct.”);
while (1);
}
totalSound = 0;
delay(500);
}
uint32_t getTempColor(float temp) {
int r, g, b;
if (temp < 68) {
r = 0; g = 0; b = 255;
}
else if (temp < 72) {
float t = (temp – 68) / 2.0;
r = 255 * t;
g = 255 * t;
b = 255 * (1 – t);
}
else if (temp < 76) {
float t = (temp – 72) / 4.0;
r = 255;
g = 255 – (100 * t);
b = 0;
}
else {
float t = (temp – 76) / 4.0;
r = 255;
g = 155 – (155 * t);
b = 0;
}
r = constrain(r, 0, 255);
g = constrain(g, 0, 255);
b = constrain(b, 0, 255);
return strip.Color(r, g, b);
}
uint32_t getColor(int level) {
int r, g, b;
if (level < 64) {
//purple to blue
r = map(level, 0, 63, 128, 0);
g = 0;
b = map(level, 0, 63, 128, 255);
}
else if (level < 70) {
//blue to green
r = 0;
g = map(level, 64, 127, 0, 255);
b = map(level, 64, 127, 255, 0);
}
else if (level < 100) {
//green to red
r = map(level, 128, 191, 0, 255);
g = map(level, 128, 191, 255, 0);
b = 0;
}
else {
// red to pink
r = 255;
g = map(level, 192, 255, 0, 20);
b = map(level, 192, 255, 80, 200);
}
return strip.Color(r, g, b);
}
int getActiveLEDs(int total){
if (total < 100) {
return 2;
} else if (total < BASE_AMOUNT + INCREMENT) {
return 3;
} else if (total < BASE_AMOUNT + INCREMENT * 1) {
return 4;
} else if (total < BASE_AMOUNT + INCREMENT * 2) {
return 5;
} else if (total < BASE_AMOUNT + INCREMENT * 3) {
return 6;
} else if (total < BASE_AMOUNT + INCREMENT * 4) {
return 7;
} else if (total < BASE_AMOUNT + INCREMENT * 5) {
return 8;
} else if (total < BASE_AMOUNT + INCREMENT * 6) {
return 9;
} else if (total < BASE_AMOUNT + INCREMENT * 7) {
return 10;
} else if (total < BASE_AMOUNT + INCREMENT * 8) {
return 11;
} else if (total < BASE_AMOUNT + INCREMENT * 9) {
return 12;
} else if (total < BASE_AMOUNT + INCREMENT * 10) {
return 13;
}else if (total < BASE_AMOUNT + INCREMENT * 11) {
return 14;
} else if (total < BASE_AMOUNT + INCREMENT * 12) {
return 15;
}
}
void playMarioMusic(){
Serial.println(“playing”);
//speakerPin
// iterate over the notes of the melody.
// Remember, the array is twice the number of notes (notes + durations)
for (int thisNote = 0; thisNote < notes * 2; thisNote = thisNote + 2) {
// calculates the duration of each note
divider = melody[thisNote + 1];
if (divider > 0) {
// regular note, just proceed
noteDuration = (wholenote) / divider;
} else if (divider < 0) {
// dotted notes are represented with negative durations!!
noteDuration = (wholenote) / abs(divider);
noteDuration *= 1.5; // increases the duration in half for dotted notes
}
// we only play the note for 90% of the duration, leaving 10% as a pause
tone(speakerPin, melody[thisNote], noteDuration * 0.9);
// Wait for the specief duration before playing the next note.
delay(noteDuration);
// stop the waveform generation before the next note.
noTone(speakerPin);
}
total2 = 0;
}
void loop() {
//MICROPHONE CACLULATING PEAK TO PEAK———————————————-
//the current time since the Arduino started (in milliseconds)
unsigned long startMillis= millis();
unsigned int peakToPeak = 0;
unsigned int signalMax = 0;
unsigned int signalMin = 1024;
//https://lastminuteengineers.com/max4466-arduino-tutorial/
while (millis() – startMillis < SAMPLE_WINDOW){
float sample = analogRead(SOUND_PIN);
if (sample < 1024){ // toss out spurious readings
if (sample > signalMax){
signalMax = sample; // save just the max levels
}
else if (sample < signalMin) {
signalMin = sample; // save just the min levels
}
}
}
static int smooth = 0;
peakToPeak = signalMax – signalMin;
if (peakToPeak < 10) peakToPeak = 0;
smooth = (smooth * 4 + peakToPeak) / 5;
totalSound += smooth;
int colorVal = map(smooth, 0, 250, 0, 255);
colorVal = constrain(colorVal, 0, 255);
uint32_t color = getColor(colorVal);
//Total leds = 30 Starting with – 4 Gradually add one on each side
int center = (NUM_LEDS / 2) – 1;
activeLEDs = getActiveLEDs(totalSound);
for (int i = 0; i < activeLEDs; i++) {
strip.setPixelColor(center + i, color);
strip.setPixelColor(center – i, color);
}
strip.show();
// delay(500);
//TEMP SENSOR—————————————————————–
//partially lifted from mcp9008text.ino -> example sketch for library
if (millis() – lastTempTime > 400) { // it slows it down so only measure every ______ ms
tempsensor.wake();
f = tempsensor.readTempF();
tempsensor.shutdown_wake(1); // go back to sleep
lastTempTime = millis();
//Serial.println(f);
}
smoothTemp = smoothTemp * 0.9 + f * 0.1;
uint32_t tempColor = getTempColor(smoothTemp);
tempPixel.setPixelColor(0, tempColor);
tempPixel.show();
//ULTRASONIC CODE——————————————————————
if (millis() – lastReadingTime > 50){
// Clears the TRIG_PIN condition
digitalWrite(TRIG_PIN, LOW);
delayMicroseconds(2);
// Sets the TRIG_PIN HIGH (ACTIVE) for 10 microseconds
digitalWrite(TRIG_PIN, HIGH);
delayMicroseconds(10);
digitalWrite(TRIG_PIN, LOW);
// Reads the ECHO_PIN, returns the sound wave travel time in microseconds
duration = pulseIn(ECHO_PIN, HIGH);
lastReadingTime = millis();
// Calculating the distance
distance = duration * 0.034 / 2; // Speed of sound wave divided by 2 (go and back)
}
//MAPPING TO CONTROL SERVOS———————————————————
if (distance > 0 && distance < 250) {
total -= readings[readIndex];
readings[readIndex] = distance;
total += readings[readIndex];
readIndex++;
if (readIndex >= numReadings) readIndex = 0;
}
average = total / numReadings;
if(distance > 20 && distance < 200){
//map to servo
ear_angle = map(average, 50, 200, 180, 30);
myservo2.write(180 – ear_angle);
}
//CAPACITIVE TOUCH PETTING
long total1 = cs_9_8.capacitiveSensor(30);
long touch2 = cs_11_12.capacitiveSensor(30);
if(total1 > 40){
tone(speakerPin, 200, 200);
delay(200);
tone(speakerPin, 150, 200);
}
if(touch2 > 200){
total2 = total2 + touch2;
}
if(total2 > 200000){
playMarioMusic();
}
}